
Share this post:
Frankenstein Face Paint Tutorial for Halloween
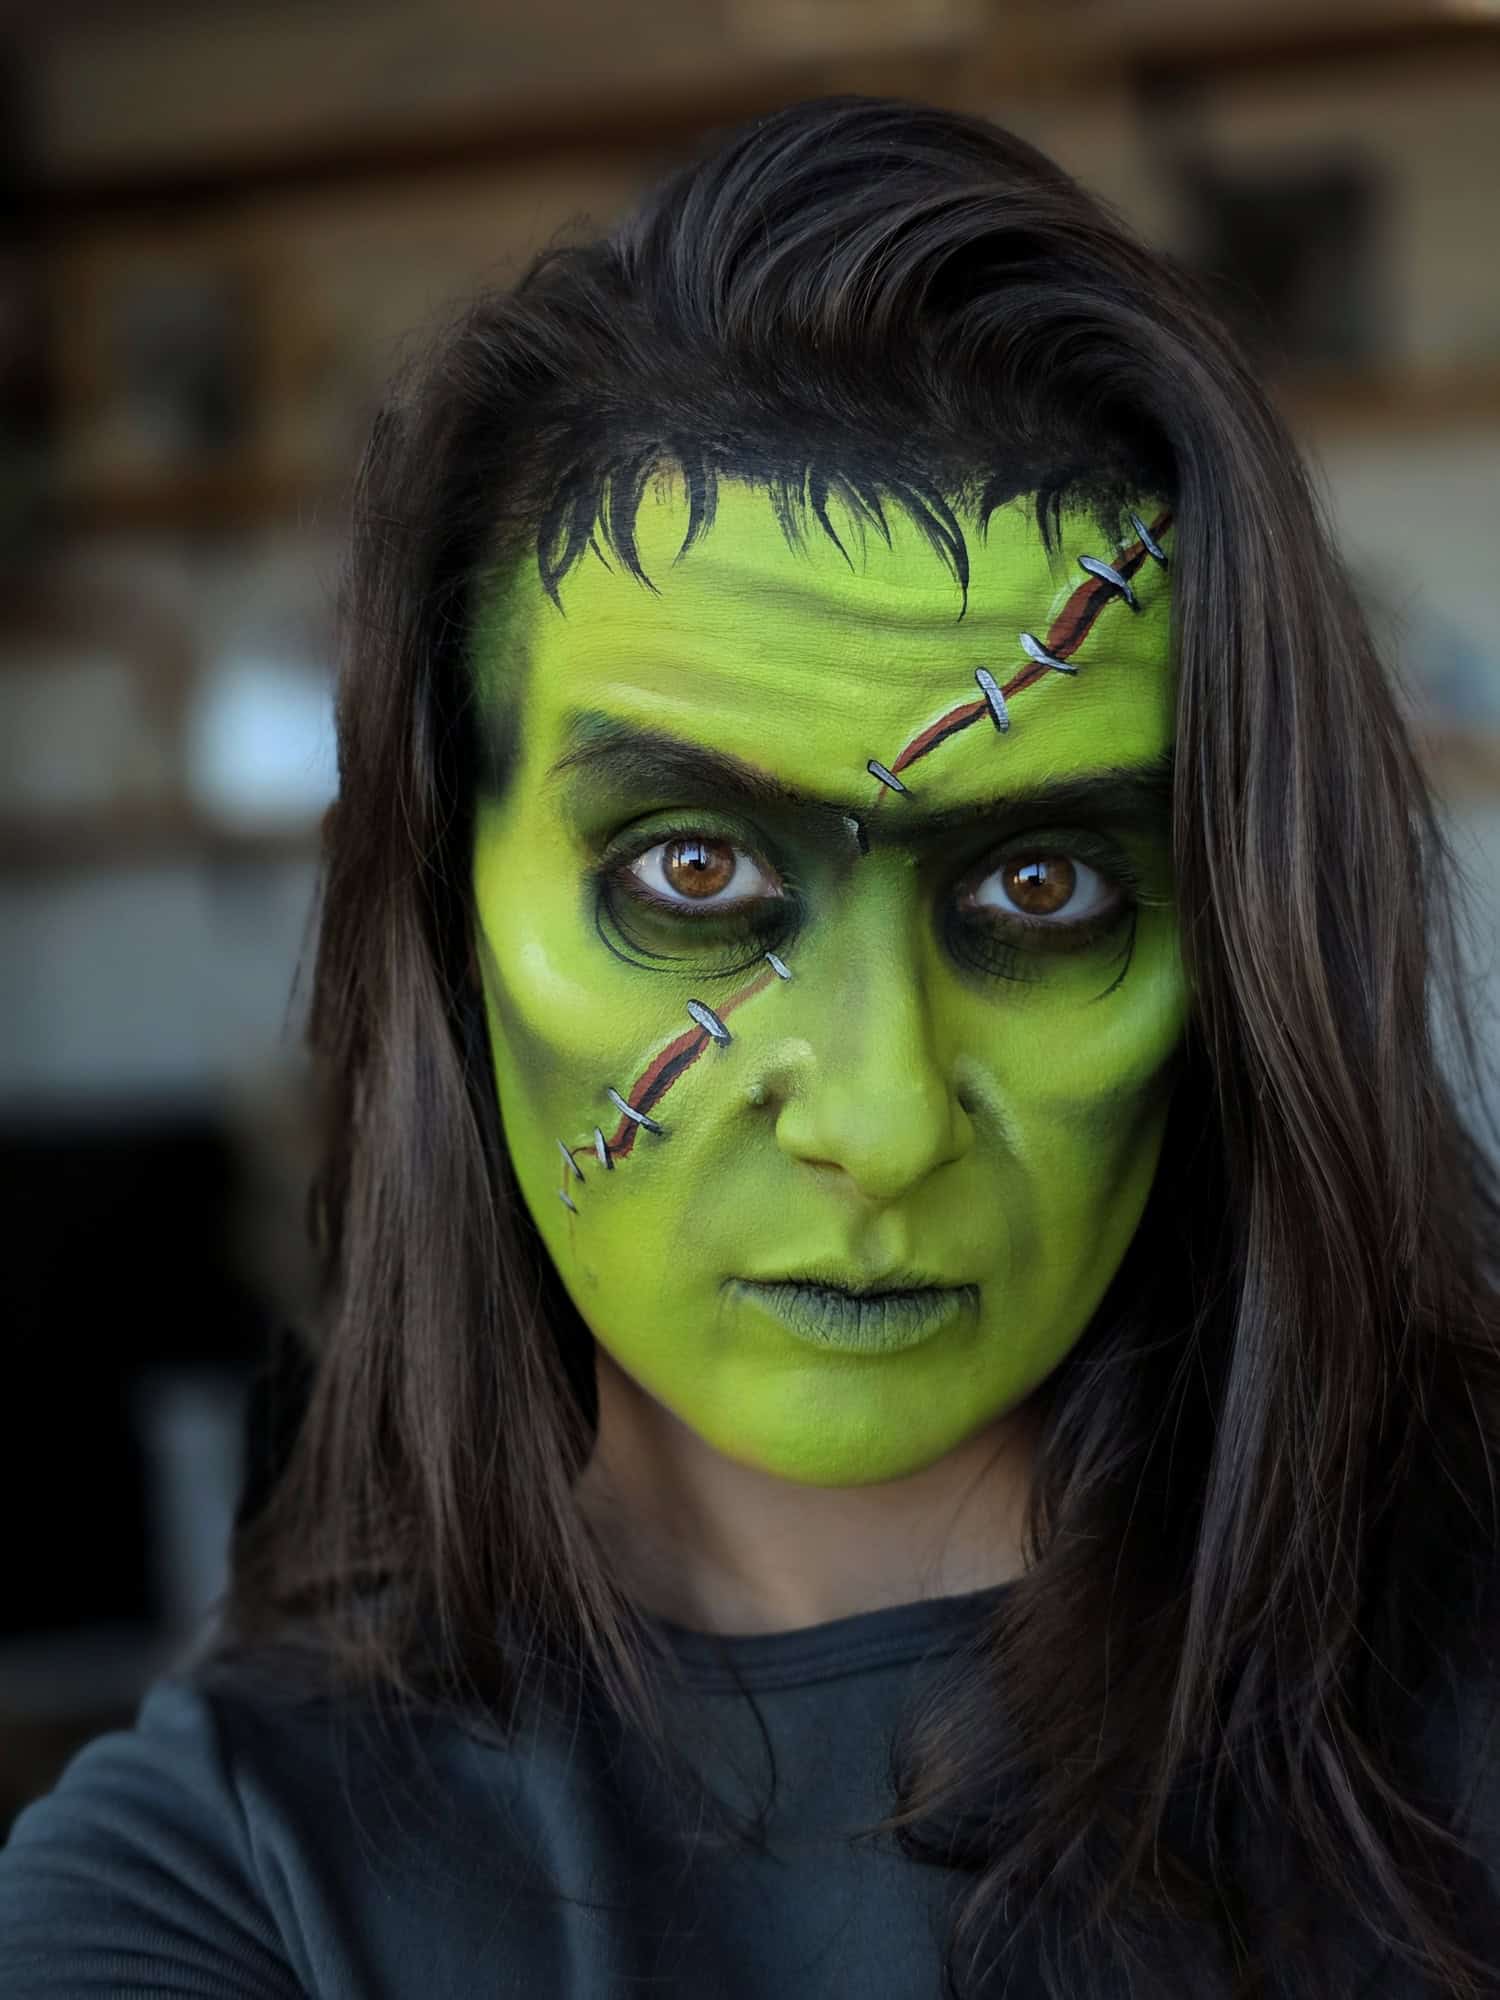
Few Halloween characters are as instantly recognizable as Frankenstein’s monster. The green skin, heavy brows, dark hair, scars, and stitches give face painters plenty to work with — and the best part is that the design can be adapted for almost any skill level.
.jpg)

In this Frankenstein face paint tutorial, we’ll show you how to build a classic monster look step by step. You can keep the design simple and playful for children, add extra shadows and wounds for a scary Halloween version, or use the same basic techniques to create a more detailed Frankenstein face paint for adults.
Whether you need an easy Frankenstein face paint for a busy Halloween event or want to practice a more dramatic monster design, start with the basic structure, then decide how spooky you want your Frankenstein to become. 🎃
What You Need for Frankenstein Face Painting
You don’t need a huge Frankenstein face paint kit to create a recognizable design. Green and black will do most of the work, while a few additional colors can help you create depth and bring the monster to life.
For the classic design, prepare:
- Professional, skin-safe green face paint
- Black face paint
- White face paint for highlights
- Grey, dark green, or purple face paint for optional shading
- A face painting sponge
- Medium round brush
- Small round brush for fine details
- Optional red face paint or cosmetic-grade fake blood for a scarier version
If you are building your first kit, take a look at our guides to face paints, face painting brushes, sponges, and complete face painting kits to learn which tools are worth having in your setup.
Always use products specifically formulated for face and body painting rather than craft or acrylic paints.
How to Face Paint Frankenstein Step by Step
Ready to create your monster? This Frankenstein face paint tutorial starts with the most recognizable features and then builds depth through linework, highlights and shading.
You can follow all six steps for the complete look, or simplify the design depending on your model, available time, and skill level.
Step 1: Paint the Green Frankenstein Base
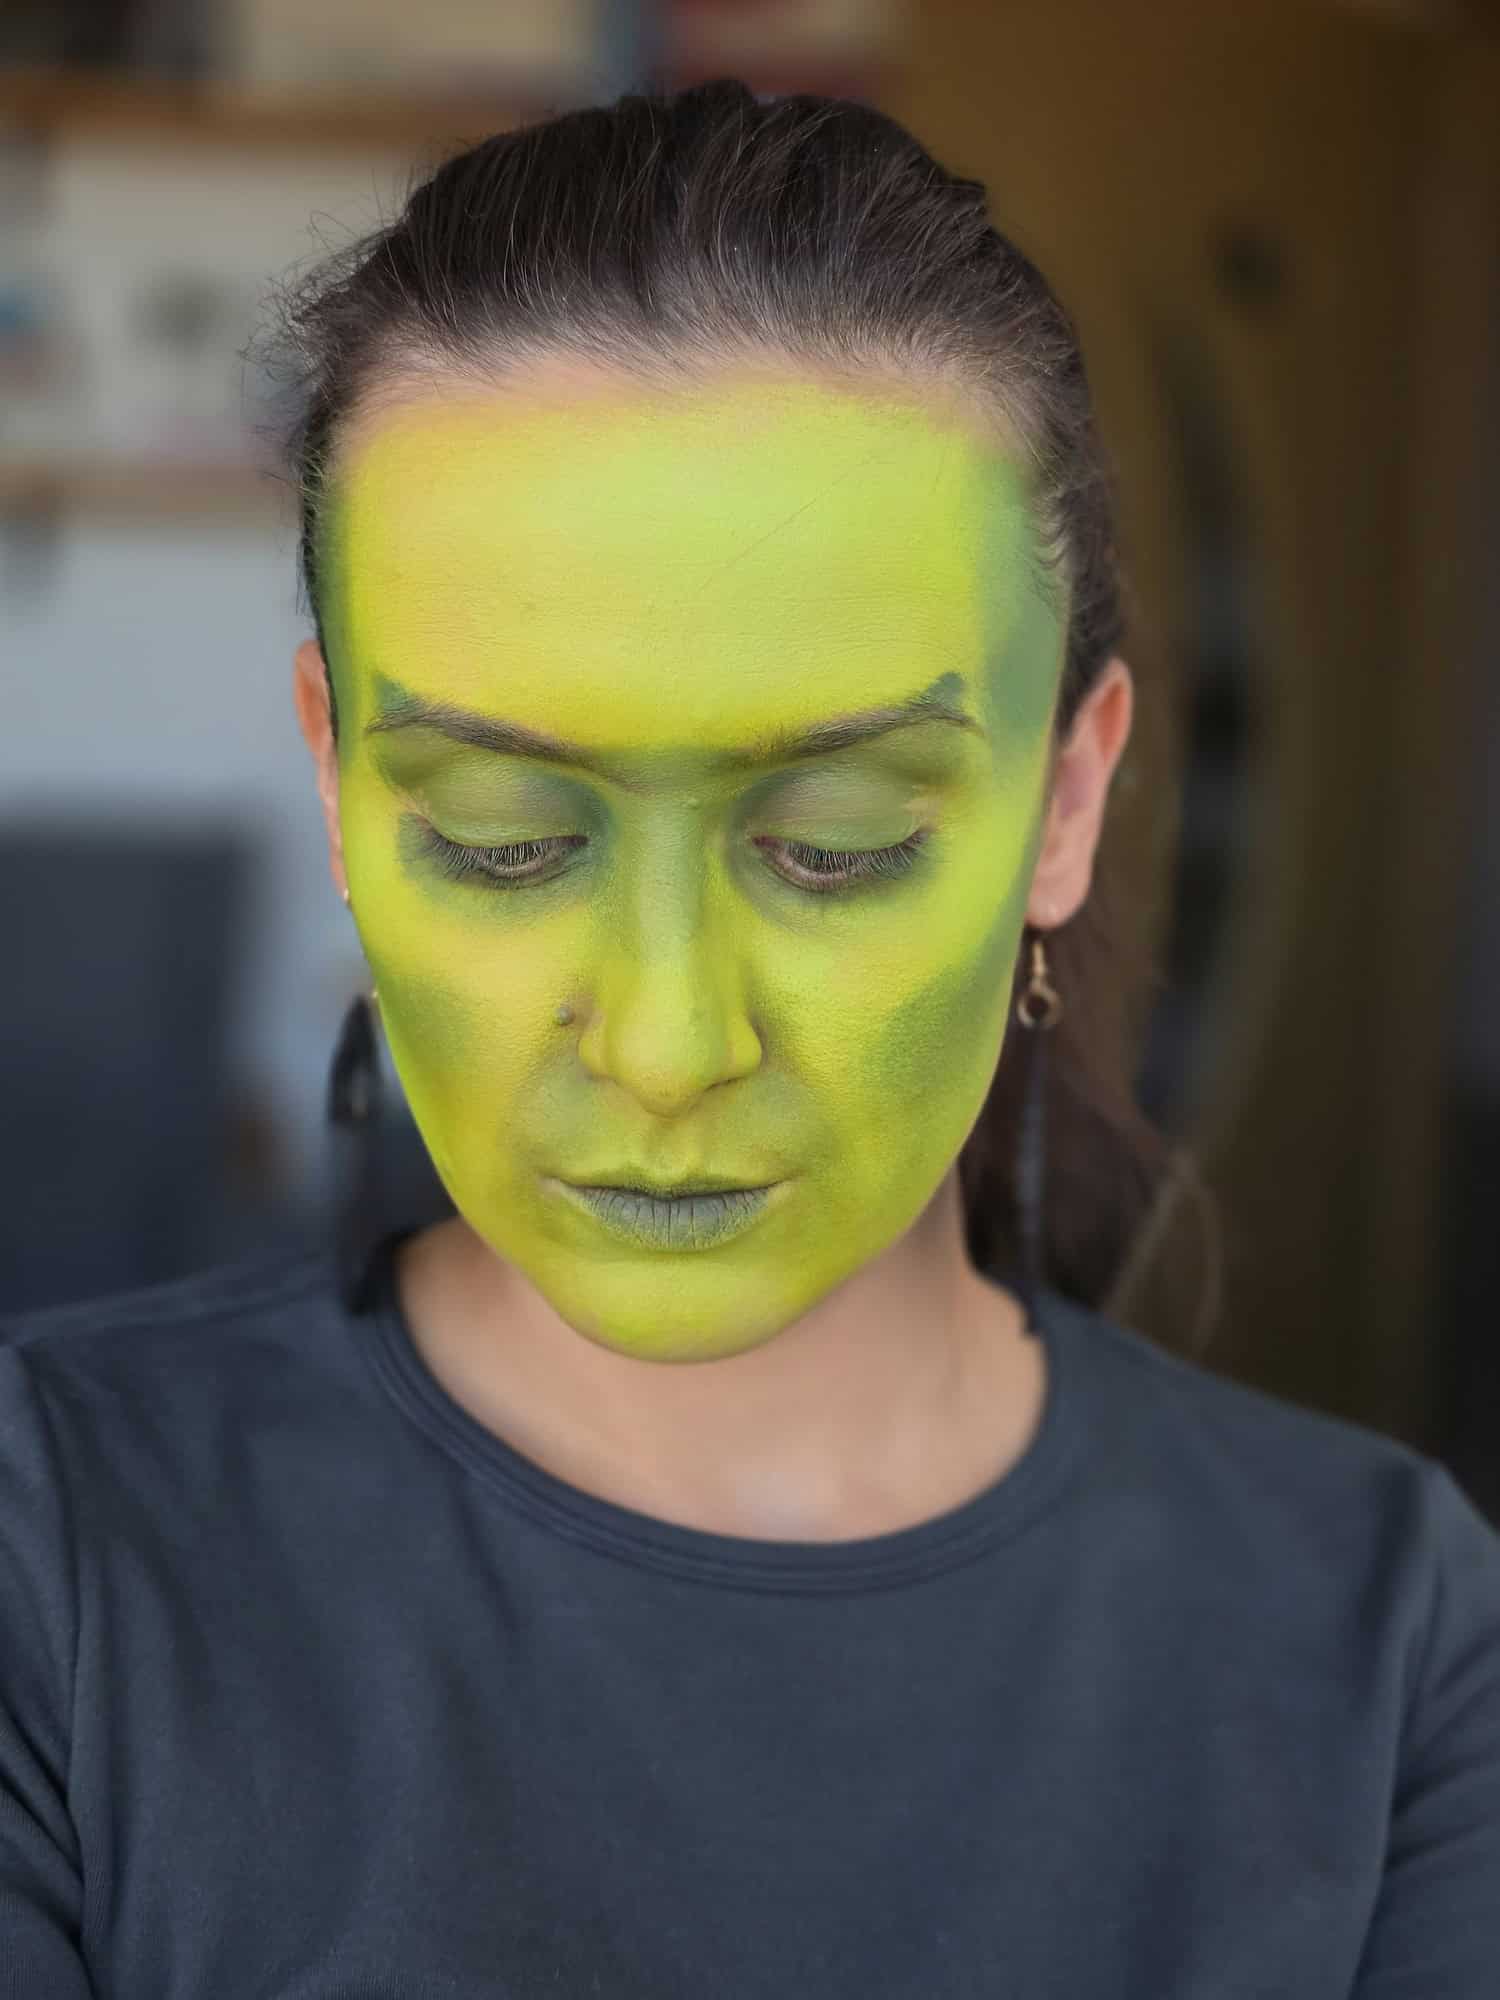
Start by loading a sponge with green face paint and applying an even base across the forehead, cheeks, and chin.
You don’t necessarily have to cover every inch of the face. For younger children especially, leaving some open space around the eyes can make the design quicker and more comfortable to wear.
Try to keep the application smooth, but don’t worry if the green is not completely uniform. Frankenstein’s monster doesn’t need perfect skin! Slight variations in the base can actually work nicely once we begin adding shadows.
If you want a less traditional look, you can also experiment with grey-green, pale olive, or muted mint instead of bright monster green.
Step 2: Paint Frankenstein’s Scars and Stitches
Now for the fun part! 😃 It’s time to give the design one of its most recognizable features.
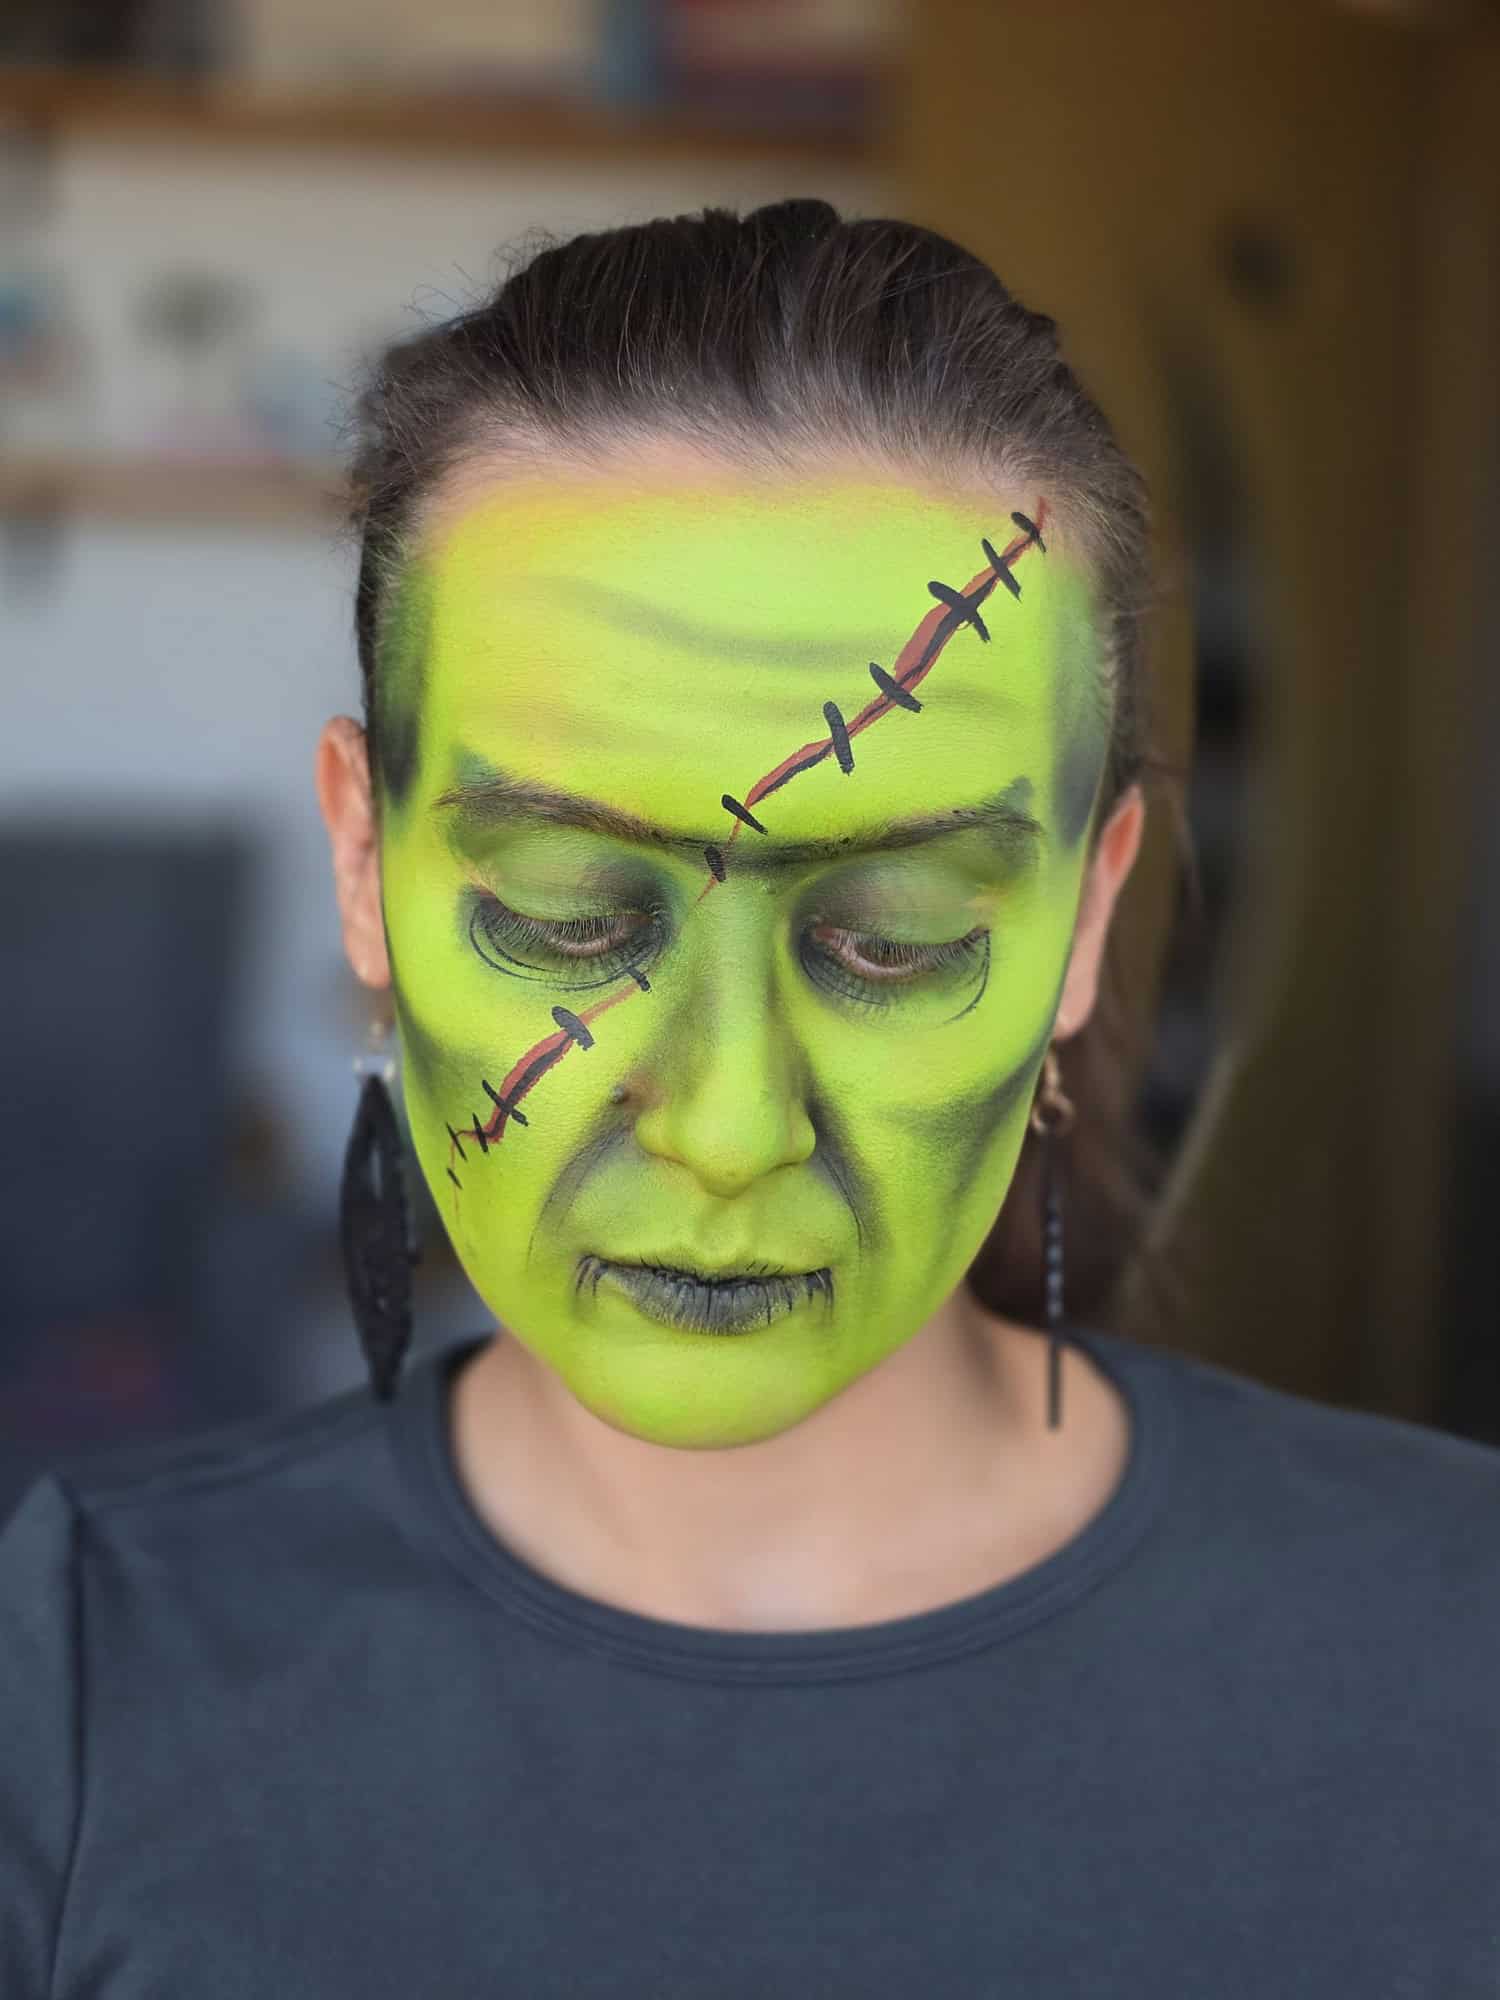
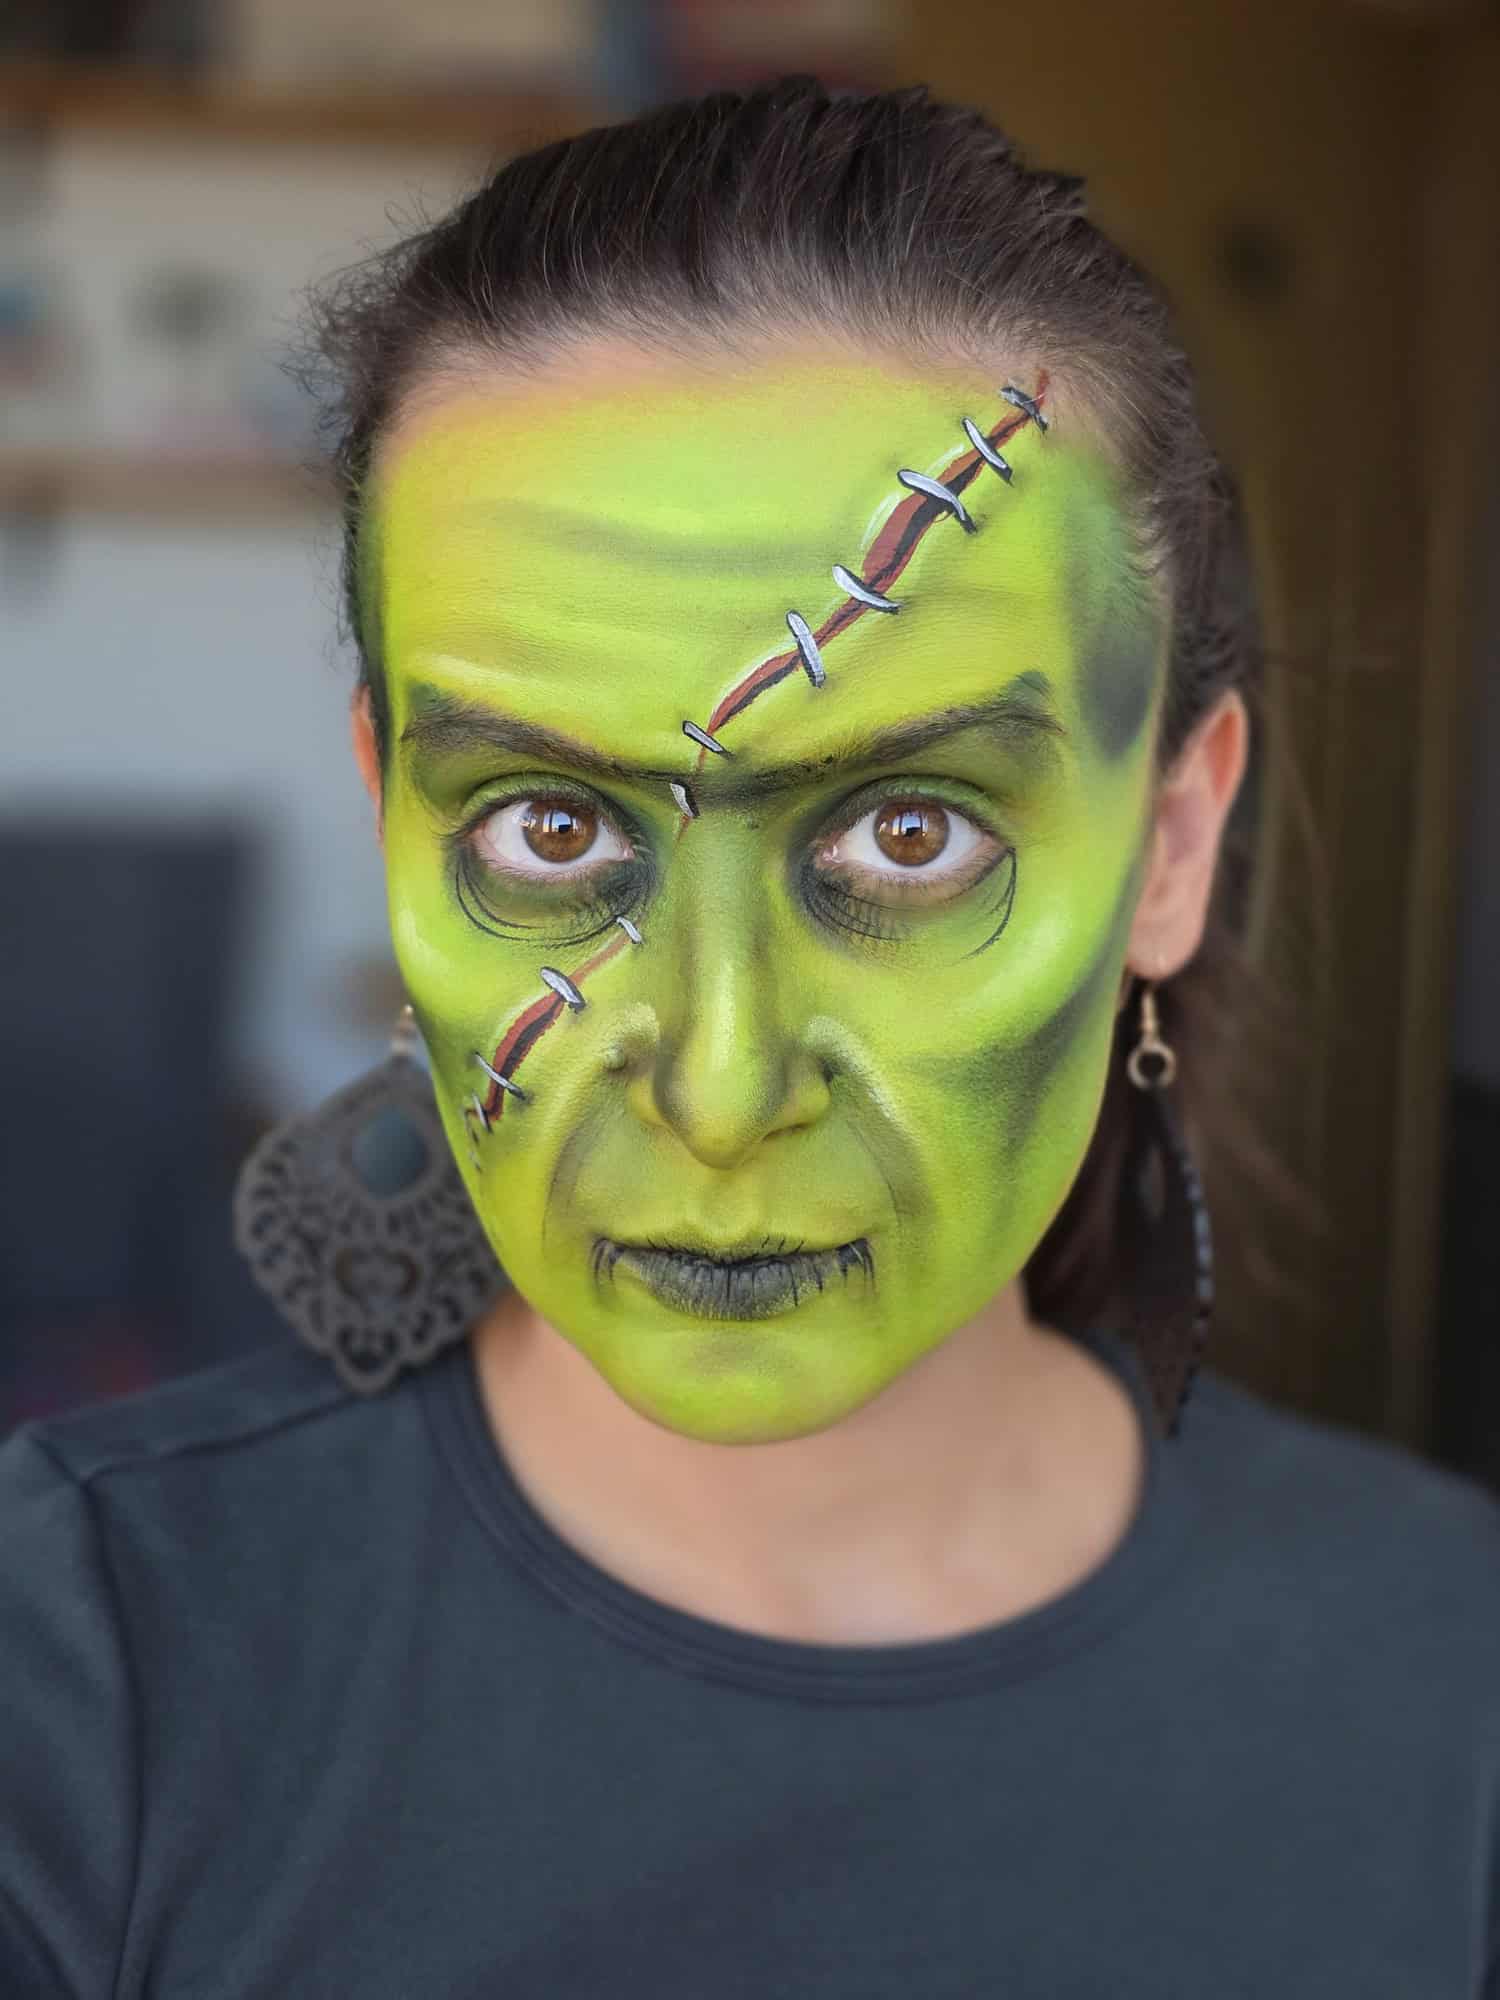
Scars and stitches are one of the easiest ways to turn a green monster into recognizable Frankenstein face paint.
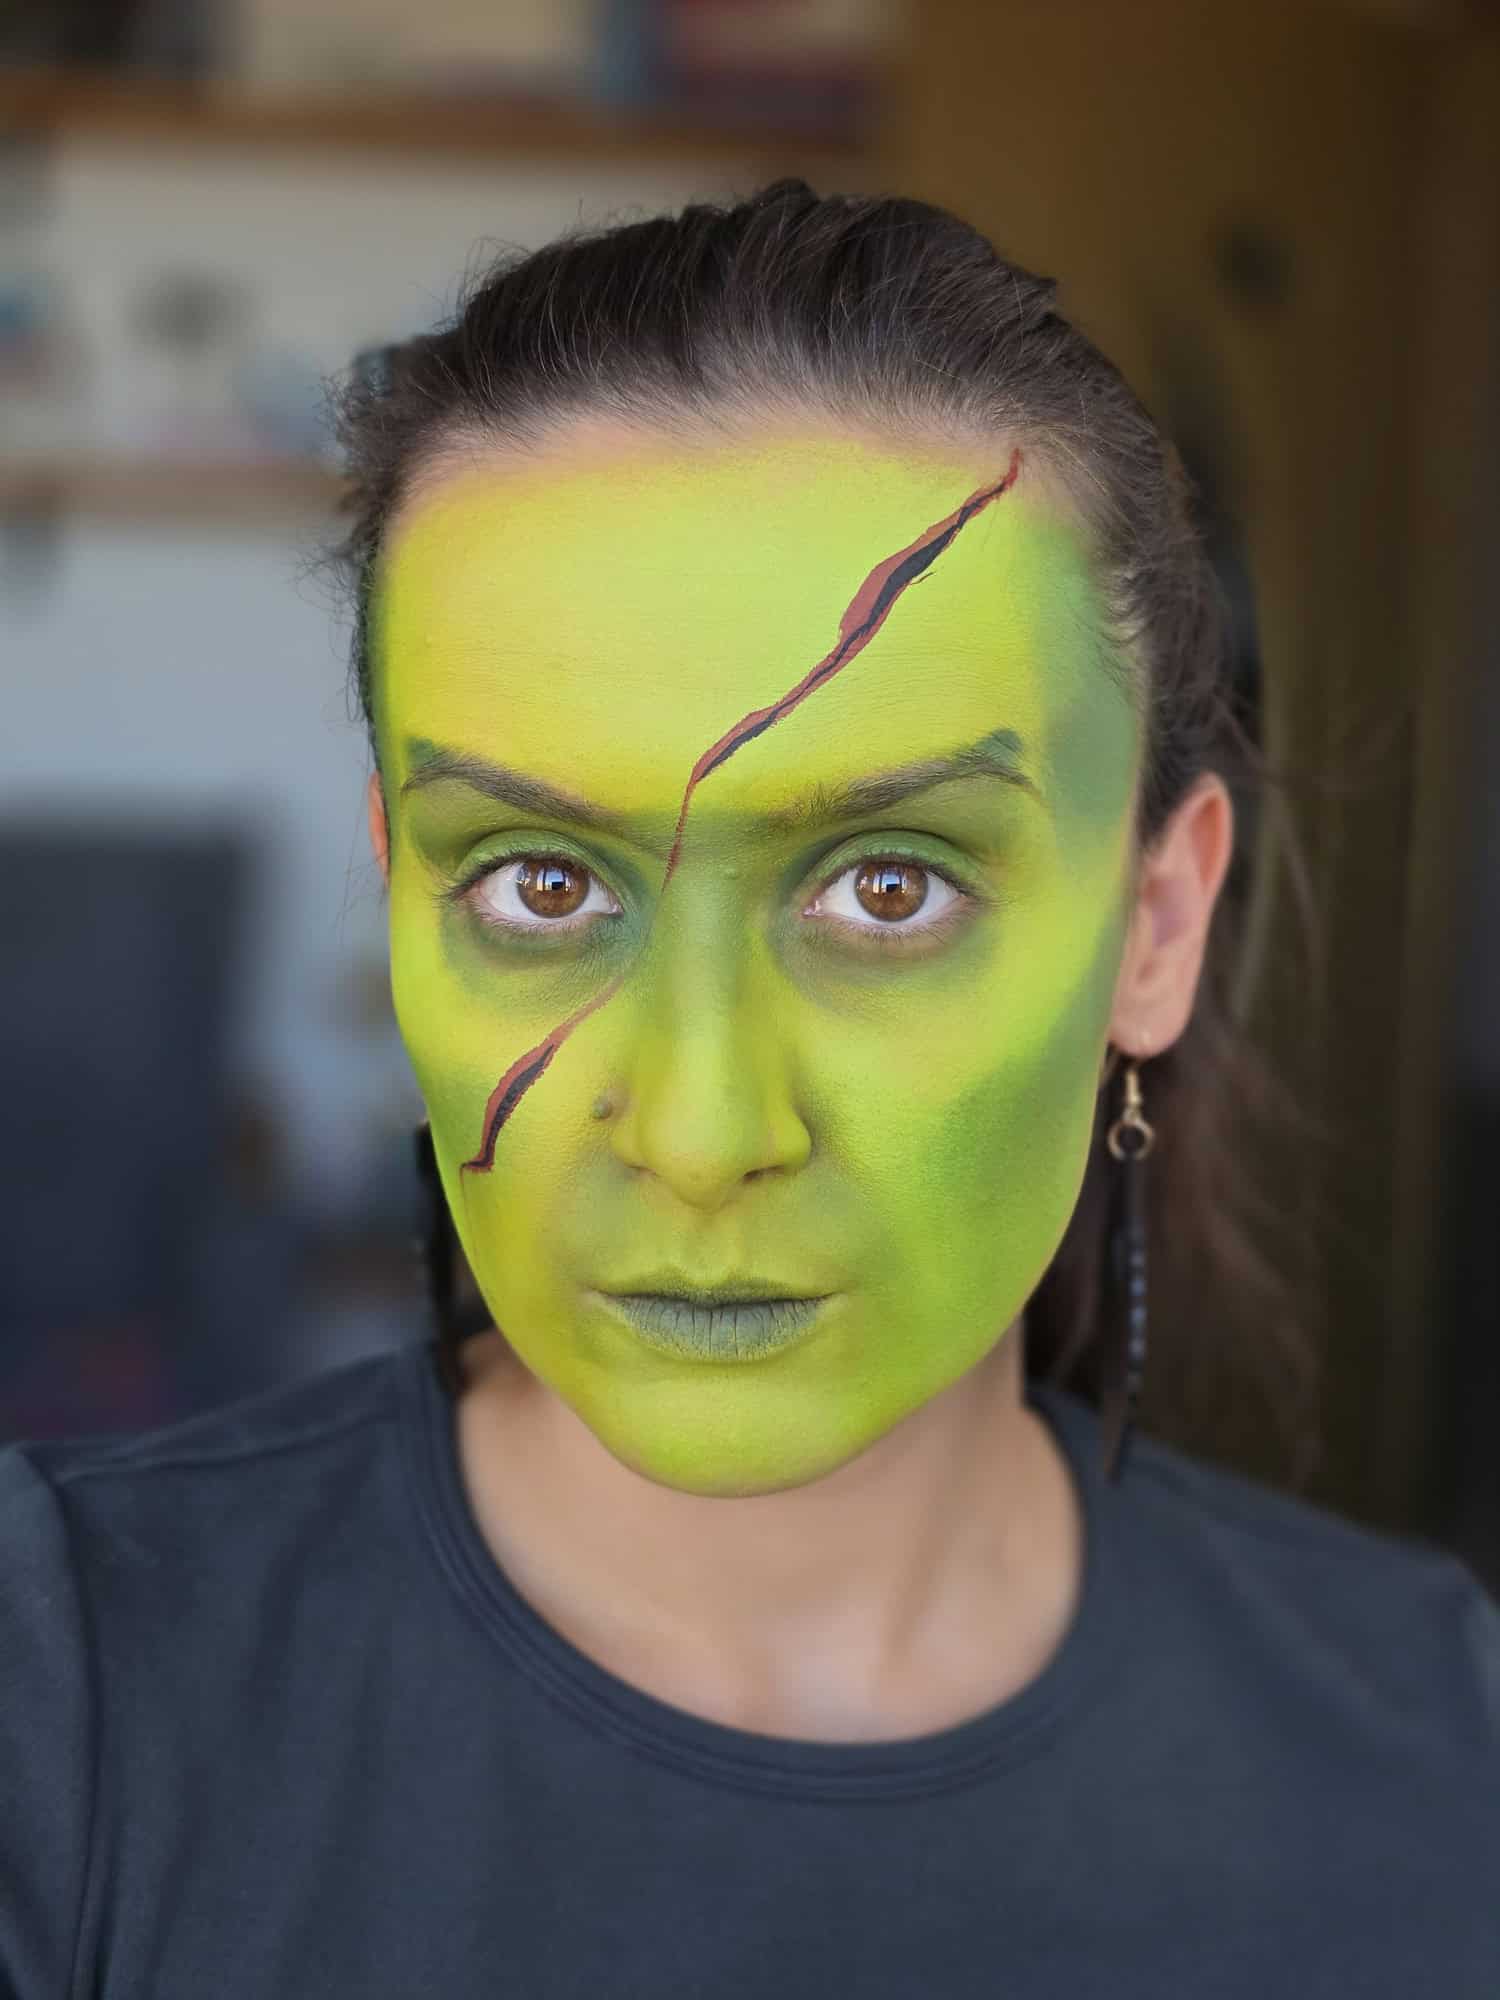
Using a small round brush and black paint, create one or two thin scar lines across the forehead, cheek, or side of the face. Then add several short lines crossing each scar to create stitches.
Try not to make every stitch identical. Slight differences in direction and spacing will make the result feel more natural.
For extra dimension, add a fine white highlight along one side of the scar and a little grey, purple or dark green shadow along the other.
If you are painting a child at a busy event, one good scar is usually enough. For an adult Halloween design, you can take this much further with deeper shading, additional cuts and more realistic wound effects.
Step 3: Add the Eyebrows and Monster Features
Next, we’re going to change the expression of the face.
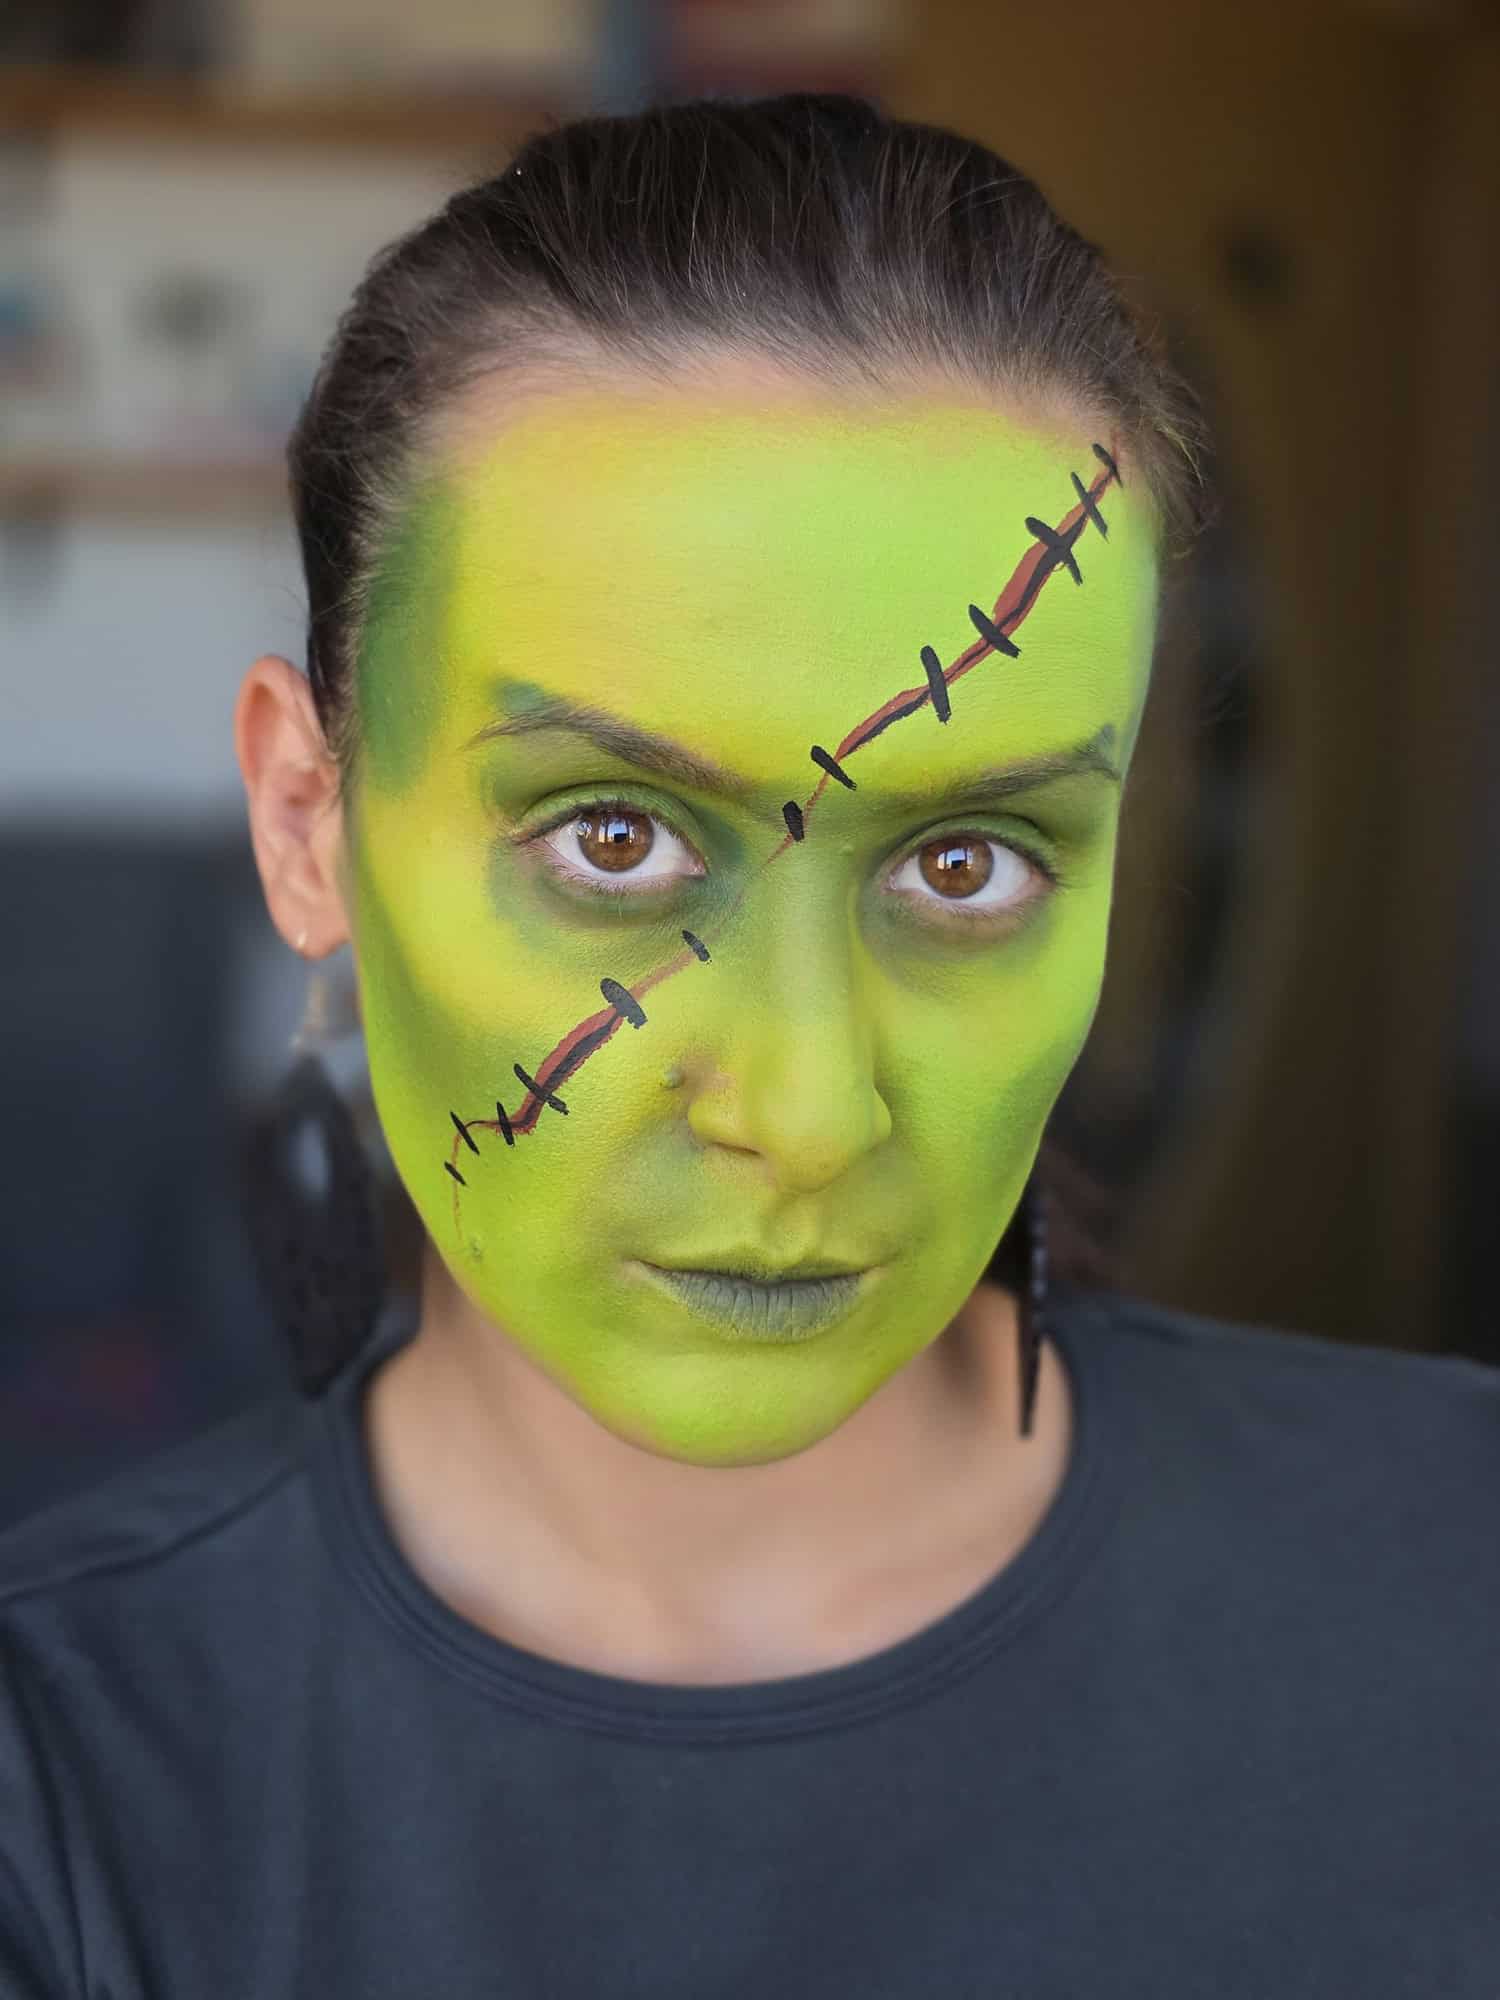
Load a round brush with black paint and create straight eyebrows, connecting them slightly toward the center of the face. Heavy brows instantly make the character look more like the classic Frankenstein monster.
Now add some definition around the eyes and sides of the nose. You don’t need to create solid black eye sockets. A few carefully placed shadows can make the face appear heavier without overwhelming the design.
You can also lightly contour beneath the cheekbones and around the temples using dark green, grey, or purple.
Remember that you are painting on a three-dimensional face. Follow the model’s natural features instead of trying to force every Frankenstein design into exactly the same shape.
Pro Tip: If you want your monster to look angry without making the design too frightening for children, concentrate on the brows rather than covering the entire eye area in black.
Step 4: Create Frankenstein’s Hair
Using black face paint and a medium round brush, create a strong hairline across the upper forehead. You can make it flat and blocky for the classic Frankenstein look or paint several uneven, jagged sections for a more cartoon-like monster.
Fill the upper section with black, keeping the bottom edge of the hairline clean and easy to recognize.
For a quick design, this can remain fairly simple. If you have more time, add a few thin black or grey strokes extending into the hair for more texture.
Step 5: Add Highlights and Shading
A green base with black details already reads as Frankenstein, but shading is what gives the monster dimension.
Look at the natural structure of the face and add darker tones around the temples, beneath the cheekbones, beside the nose, and underneath the brows.
Then add small white or pale green highlights to the forehead, bridge of the nose and tops of the cheekbones.
Blend where necessary so that the shadows become part of the base rather than looking like separate stripes.
You don’t need a lot. Even a small amount of dark green or purple around the eyes and cheeks can completely change the character.
If you’re creating Frankenstein face paint for a child, keep the shading softer. For a scary adult version, exaggerate those hollows and contrasts.
Step 6: Add the Final Monster Details
Finish your Frankenstein by choosing a few details that suit the look you want to create.
You can paint small bolts near the sides of the neck or jawline, add cracks around the forehead, extend the stitches, or introduce tiny red details around a wound.
For a spooky but still child-friendly design, black stitches and a couple of cracks are usually enough.
For a scarier Halloween look, add bruised purple shading, deeper eye sockets, wounds or small amounts of cosmetic-grade fake blood where appropriate.
Take one final look at the whole design before adding more. Halloween face painting can be detailed without becoming overcrowded, and a few strong Frankenstein features usually work better than trying to fit every monster effect onto one face.
And there you have it, your Frankenstein monster is ready for Halloween! 👻
Easy Frankenstein Face Paint for Beginners
Need something faster?
A recognizable simple Frankenstein face paint doesn’t require six detailed steps or advanced blending. This version is perfect for beginner face painters, parents painting at home, or professionals who need a faster option for busy Halloween events.
5-Minute Frankenstein Face Paint
Start with a light green base across the forehead and cheeks. Add a bold black stitch across the forehead, followed by two straight eyebrows.
Next, paint the black hair on the forehead. Add a little black around the sides of the face or beneath the cheekbones if you have time.
That’s it!
The essential formula is:
Green skin + stitches + straight eyebrows + black hair = Frankenstein.
Once those features are in place, most people will recognize the character immediately.
If you are just beginning to learn face painting, don’t feel pressured to add advanced shading. Clean shapes and controlled linework will usually make a bigger difference than adding lots of detail.
Scary Frankenstein Face Paint for Halloween
Want to make your monster much creepier?
Start with the same basic Frankenstein Halloween face paint, but increase the contrast and texture.
Darken the area around the eyes using grey, purple, dark green, or black. Add stronger shadows beneath the cheekbones and around the temples to make the face look more sunken.
You can then introduce extra stitches, cracked skin, and wounds. A little red around selected cuts can add drama without covering the entire face in blood.
For a more realistic monster effect, think about where injuries and bruises would naturally create shadows. Layering purple, red, and darker green tones can make wounds appear much more dimensional than outlining everything heavily in black.
You can also add a larger stitched wound across the forehead or cheek.
Want to make your Frankenstein look even scarier? Combine this design with techniques from our Wounds, Cuts & Bruises Face Paint Tutorial to create more realistic Halloween SFX details.
Frankenstein Face Paint Ideas
Once you understand the basic Frankenstein structure, there is no reason every design has to look the same.
Variations you can try include a classic green Frankenstein monster, a cute Frankenstein for young children, a scary stitched version, a half-face monster, a realistic adult Frankenstein, or even a zombified variation with wounds and exposed details.
For busy events, you might use a smaller Frankenstein mask rather than covering the whole face. A forehead-and-eye design with green paint, black hair, and stitches can still communicate the character while reducing painting time.
You can also experiment with different color combinations. Traditional green is instantly recognizable, but pale grey, turquoise-green, or desaturated green can create a completely different mood.
And remember: your design doesn’t have to be frightening. A smiling mouth, softer brows, and just one or two stitches can turn Frankenstein into a fun Halloween character for younger kids.
Bride of Frankenstein Face Paint
Why should Frankenstein have all the fun? 😉
Bride of Frankenstein face paint uses many of the same monster elements, but gives you an opportunity to create something much more dramatic and glamorous.
How to Create a Bride of Frankenstein Face Paint
Begin with a pale green, grey-green, or very light base.
Instead of the heavy monster eyebrows used in the classic Frankenstein design, create more defined brows and dramatic eye details. You can use black around the outer corners of the eyes and add white highlights to increase the contrast.
Next, add one or two scars with stitches along the forehead, cheek, or jawline.
The iconic hair is what really sells the character. If you are incorporating the hair into the face painting itself, use black details around the forehead and temples with contrasting white or silver sections to reference the Bride’s famous black-and-white hairstyle.
From there, you can decide which direction to take the design.
Keep the features elegant and add clean linework for a glamorous Bride of Frankenstein, or introduce darker shadows, wounds, and cracked skin for something much scarier.
Bride of Frankenstein Face Paint Ideas
A classic Bride design can combine pale green skin, stitched scars and dramatic black-and-white details. For Halloween parties and adult events, you can push the look further with stronger eye makeup, deeper contouring, and more realistic scars.
A half-face Bride is another great option. Keep one side relatively glamorous and transform the other into a stitched monster.
And, of course, Frankenstein and the Bride make a fantastic Halloween pair if you are painting couples, siblings, or friends.
Frankenstein Face Paint for Adults
The basic design works just as well on adults, but you can usually add more detail and stronger contrast.
For Frankenstein face paint for adults, spend more time on contouring the natural structure of the face. Deepen the temples and cheekbones, create darker shadows around the eyes, and use highlights to exaggerate the forehead and nose.
Scars can also become more realistic. Instead of simple black stitched lines, build them using several tones and add highlights and shadows to create the illusion that the skin is raised or damaged.
You can also extend the design down toward the jaw and neck with painted bolts, scars or additional monster details.
For costume parties, theatrical Halloween looks or photo shoots, these extra details can transform simple Frankenstein costume face paint into a much more dramatic character.

Frankenstein Face Painting FAQ
How do you face paint Frankenstein?
Start with a green face paint base, then add a black Frankenstein-style stitch and straight eyebrows. Add a black hairline, followed by darker shading around the eyes, temples, and cheekbones. Finish with highlights and optional details such as neck bolts, cracks, wounds, or fake blood.
What colors do you need for Frankenstein face paint?
Green and black are the two essential colors for classic Frankenstein face paint. White is useful for highlights, while grey, purple, and darker green can be used for shadows and bruising. Red can be added if you want wounds or a scarier Halloween effect.
How do you make an easy Frankenstein face?
For a very easy Frankenstein design, paint a green base, add one or two stitched scars and heavy eyebrows, and finish with a black hairline. Those few recognizable features are enough to create a simple Frankenstein face without advanced shading or detailed effects.
How do you make Frankenstein face paint look scary?
Use darker shadows around the eyes, cheekbones, and temples, then add extra scars, stitches, bruising, and cracked skin. For a more dramatic Halloween look, you can also add realistic wounds or small amounts of cosmetic-grade fake blood.
Can you use Frankenstein face paint for an adult Halloween costume?
Absolutely. The same basic Frankenstein design can be adapted for adults by adding stronger contouring, more realistic scars, darker shading, and additional details around the jaw and neck. Adult designs also work well with more theatrical wound and SFX effects.
What do you need in a Frankenstein face paint kit?
A basic Frankenstein face paint kit should include professional green, black and white face paints, a sponge, and a few round brushes. Grey, purple, and red paints are useful additions if you want more detailed shading, bruises, or wounds.
How do you paint the Bride of Frankenstein face paint?
Begin with a pale green or grey-green complexion, then add dramatic eyes, defined brows and stitched scars. Black and white details around the forehead or temples can reference the Bride’s iconic hairstyle. From there, you can keep the design glamorous or add wounds and darker shading for a scarier Halloween variation.
Ready to Take Your Face Painting Skills Further?
Learning individual Halloween designs is a great way to practice, but understanding the techniques behind them gives you much more creative freedom.
Inside Artists Studio, you can follow complete tutorials, practice new designs, and continue developing your skills alongside a community of face painters.
Continue Learning in Artists Studio →
