
Share this post:
How to Become a Professional Face Painter
Face painting is more than just colors on skin—it’s art, entertainment, and business all in one. Whether you dream of making kids’ parties unforgettable, volunteering at local fairs, or building a professional career, this guide is here to help. You’ll learn how to get started with the right tools, practice essential techniques, and develop your own style. Beyond the creative fun, we’ll also show you how to build credibility, find clients, and start earning money for your art. With the right steps, anyone can turn face painting from a hobby into a rewarding side hustle—or even a full-time profession.
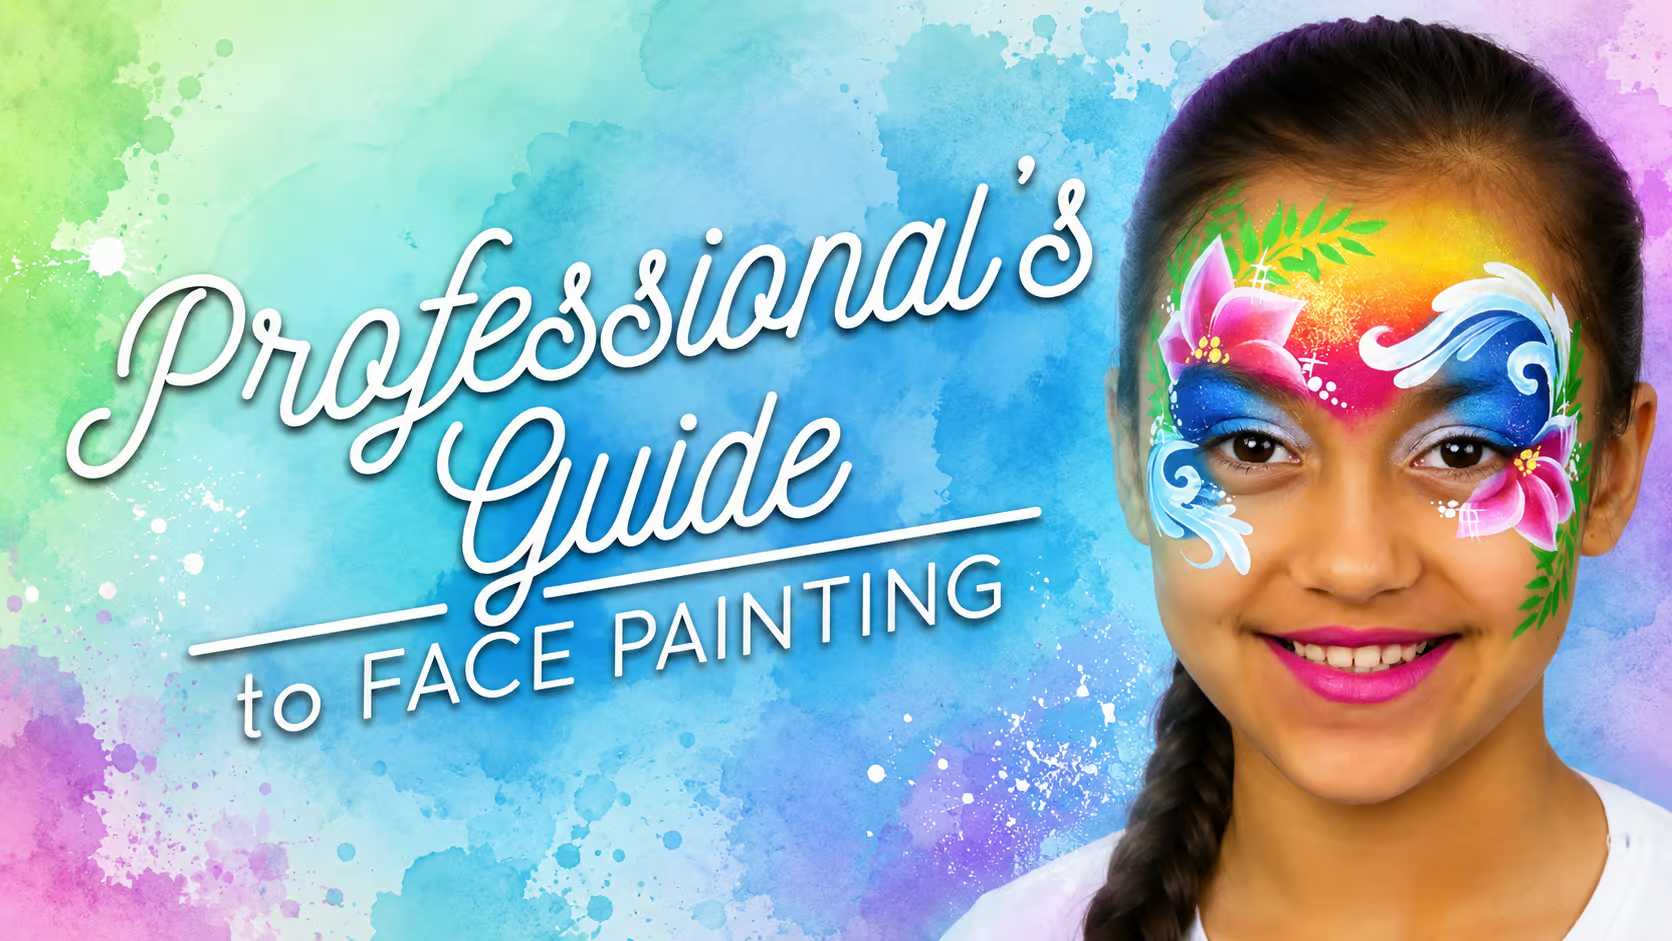


Explore our most popular Beginner’s Guide to Face Painting for everything you need to get confident with essential techniques.
Why Face Painting?
Face painting blends creativity, people skills, and a bit of everyday magic.
What once started as a simple hobby has evolved into a field that now requires solid techniques, proper safety knowledge, and genuine professional training. And the industry is growing faster than ever.
It can be:
• A fun, creative hobby for parents, teachers, or volunteers.
• A joyful side hustle for birthday parties and local events.
• A fulfilling career path in entertainment, festivals, or even film and theater.
As the industry grows, so does the value of well-trained artists. That’s why, as the only institution in the world that teaches and certifies face painters globally, we created a structured PRO Course designed to match today’s professional standards and help new artists feel confident from day one.
If you love art and enjoy connecting with people, face painting can be a flexible, rewarding, and genuinely fun journey.
👉 Still deciding whether to turn your hobby into a career?
Don’t miss our blog, Top 10 Reasons to Become a Face Painter.
Types of Face Painters
Face painters work in many settings, each with unique expectations. Start by finding your niche.
💡 Tip: Start small (birthdays, local fairs) and expand as you gain confidence.
Don’t Miss Out: Subscribe today to receive expert tips and tricks, fresh face painting ideas, step-by-steps, and more.
Core Skills You’ll Need
A good face painter needs more than just a steady hand for continued success.
Artistic Skills
- Linework & brush control
- Blending & shading
- Color theory & character replication
Mastering these core techniques allows you to bring any design to life with precision, depth, and creativity.
Client Management
- Working with children
- Handling crowds & queues
- Customer service
Good client management ensures your sessions are fun, organized, and leave everyone smiling.
Professionalism
- Speed & time management
- Hygiene & safety (sanitizing tools, avoiding allergens)
- Legal awareness (consent, liability waivers)
Maintaining professional standards builds trust, protects your business, and keeps your clients safe.
🎯 Skill Levels
- Beginner: Basic designs (flowers, butterflies)
- Intermediate: Layered designs, superheroes, animals
- Advanced: Complex full-face, special effects, airbrushing
- Master Artist: Portfolio-based expert, often hired for high-end gigs
Tracking your skill level helps you know what to practice next and shows clients what you can confidently deliver.
Tools of the Trade
No need to get overwhelmed. Your kit doesn’t need to be extensive at the start. A small, well-organized set works best.
Face Paint Types
Professional artists use high-performance brands that offer strong pigmentation, smooth application, and safe ingredients suitable for sensitive skin. The main categories are:
- Water-based (easy to apply & remove)
- Cream-based (longer wear, good for SFX)
- Metallic/UV paints (festivals, night events)
- Powders (good bases for hot days, adding depth & blending designs)
- Water resistant (typically alcohol based or liquid paints, for airbrushing or brush)
Recommended PRO brands:
TAG, Diamond FX, Superstar, Kryvaline, Global Colours, Fusion Body Art
These paints provide:
- Strong opacity and vibrant colors
- Smooth blending and crisp linework
- Long wear without cracking
- Safe formulas (FDA/EU compliant)
Looking for a professional setup? Check out our dedicated guide on Best Face Paints for detailed suggestions.
Brushes & Sponges
A reliable brush set is essential for clean lines, smooth strokes, and professional results. Focus on tools created specifically for face and body art.
Brush types you’ll use most:
- Round brushes (sizes 1–6) for linework, teardrops, outlines
- Flat or angled brushes for one-stroke techniques
- Detail/liner brushes for fine details
- Petal brushes for fast flowers and leaf shapes
- Filbert brushes for filling in large bases, creating shapes and blending
- Quality sponges for bases, gradients, and blending
Professional brush brands commonly used in the industry include:
Paint Pal, TAG Brushes, Bolt, Blazin Brush, King Art
Pro Tip: Always clean and sanitize brushes between clients to maintain hygiene and extend the lifespan of the brushes.
Check out our dedicated Best Brushes for Face Painting guide for exact suggestions on professional brush brands.
Professional Face Painting Kit
Your professional kit will grow and evolve as your skills develop and your style takes shape. The tools and paints you rely on will vary depending on your preferred techniques: some artists primarily use brushes, others specialize in one-stroke or sponge techniques, while some combine multiple methods.
Start with the essentials and gradually expand your collection as you gain experience and income. A well-prepared kit allows you to tackle a wide variety of designs: from bold full-face creations to detailed character work.
A complete professional starter kit typically includes:
- Face Paints:
- Waxy white for linework
- Waxy black for linework
- 25–30 assorted singular colors: regular (base), metallic (pearl), and neon/UV
- Large split-cakes for sponging (4–6 combinations)
- Small split-cakes for one-stroke techniques (8–10 combinations)
- Brushes:
- Two sets of round brushes (#1–#6), one set for white, one for colors
- #3 and #4 round brushes for black linework
- Three angled brushes (½, ⅝, ¾ in)
- Three flat brushes (½, ¾, 1 in)
- Filbert brushes (½ in / 10 mm and 1 in)
- Two blending brushes
- Sponges & Tools:
- Half-circle and petal sponges
- Water rinsing container and fine mist spray bottle
- Stencils for quick and repeatable patterns
- Assorted cosmetic-grade glitters (fine, coarse, chunky, gel-based)
- Wet wipes for hygiene and quick corrections
- Plastic travel mirror
- Storage & Optional Extras:
- Durable case or bag for organizing and transporting your kit
- Optional items: professional chair, table, tent, or additional props for events
Why a PRO Kit Matters
A professional kit ensures you have the right tools for every design and event type. Whether you are painting for children’s parties, festivals, corporate events, or theatrical productions, the proper selection of paints, brushes, and accessories will help you work efficiently, safely, and creatively.
Buy the Professional Face Painting Kit
The Training Path: Learn Before You Earn
Like any art form, practice is key!
Techniques to learn
Your growth as a face painter depends on mastering the core techniques that create clean, impressive designs.
The following techniques are geared toward advanced artists who are ready to elevate their skills and fully embrace the standards of certified face painters:
- Confident & Clean Linework
Linework is the KEY SKILL for flawless face painting. Symmetry is the biggest challenge — here's how professionals master it.
Practice Progression
Practice in all directions:
- Left to right, right to left, top to bottom, bottom to top
- Create longest lines possible — builds hand stability
- Train yourself to paint equally well in all directions
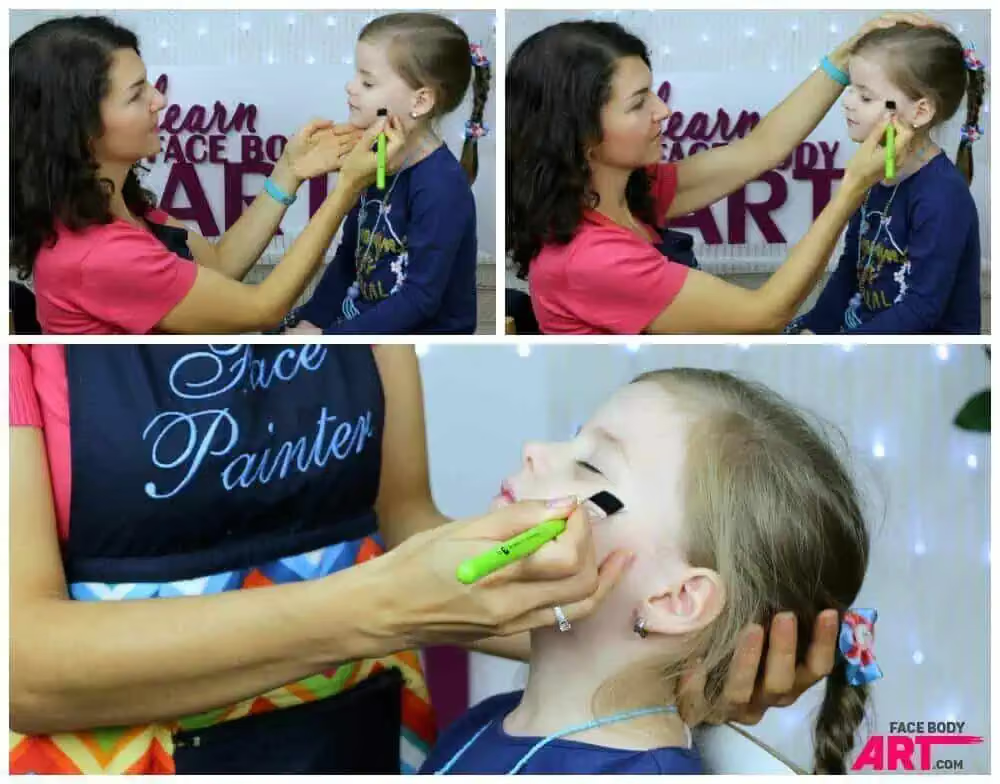
Body Position Matters
Find a comfortable position:
- Look straight at client
- Keep back, neck, knees pain-free
- Alternate between standing (tall clients) and sitting (small kids)
Discomfort = tension = poor linework. Invest in orthopedic footwear.
The Left-Right Alternating Method
Don't paint entire half-face then copy it. Instead:
- Paint one detail right, immediately paint left
- Switch sides frequently (every detail, not every half)
- Trains your brain to mirror naturally instead of forcing symmetry
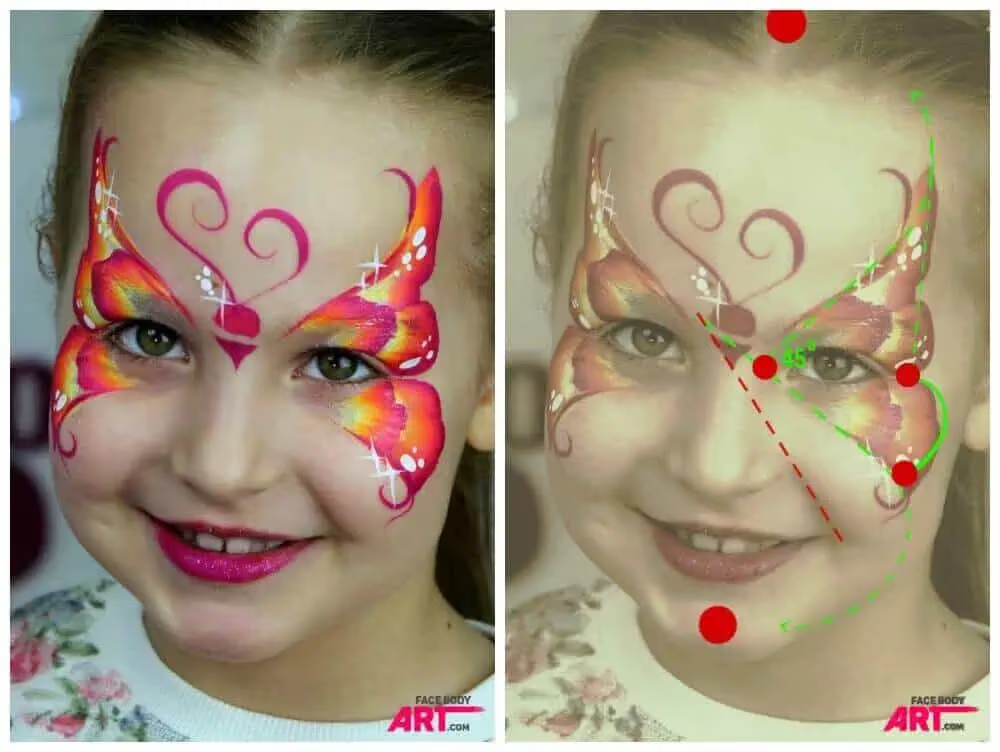
Use Guides & Focal Points
- Lightly sketch guidelines (makeup pencil or skin-tone paint)
- Mark focal points (forehead center, nose bridge, chin center)
- Paint in small linked sections, not continuous lines
- Guidelines prevent design drift
Distance Check & Photo Verification
- Step back every 1-2 minutes to view from distance
- Take photos during work—camera reveals imbalances you miss in person
- Close-up work masks the "big picture"
Pro Tip: The Distraction Technique
When mistakes happen:
- Add bold center element (butterfly body, character nose)
- Layer on highlights, sparkles, dots, teardrops
- Strong contrast disguises flaws
- Confidence matters—clients focus on your energy
Remember: Symmetry is 90% mindset, 10% technique. Master the method, trust the process.
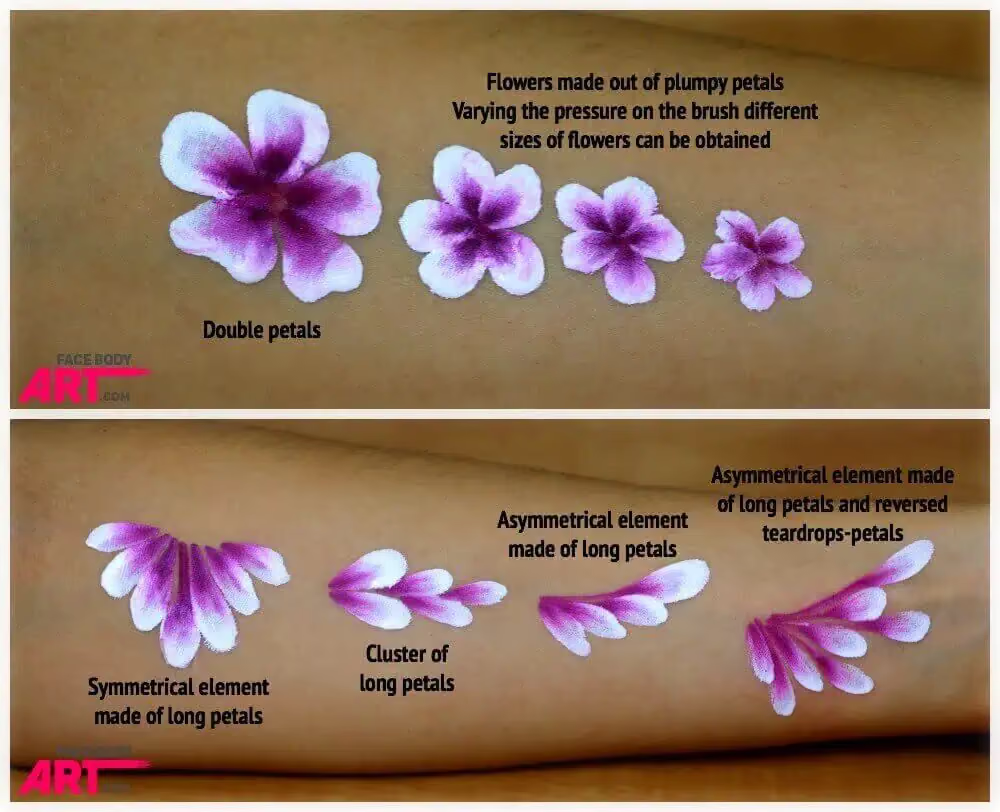
- Double Dip & Triple Dip Technique
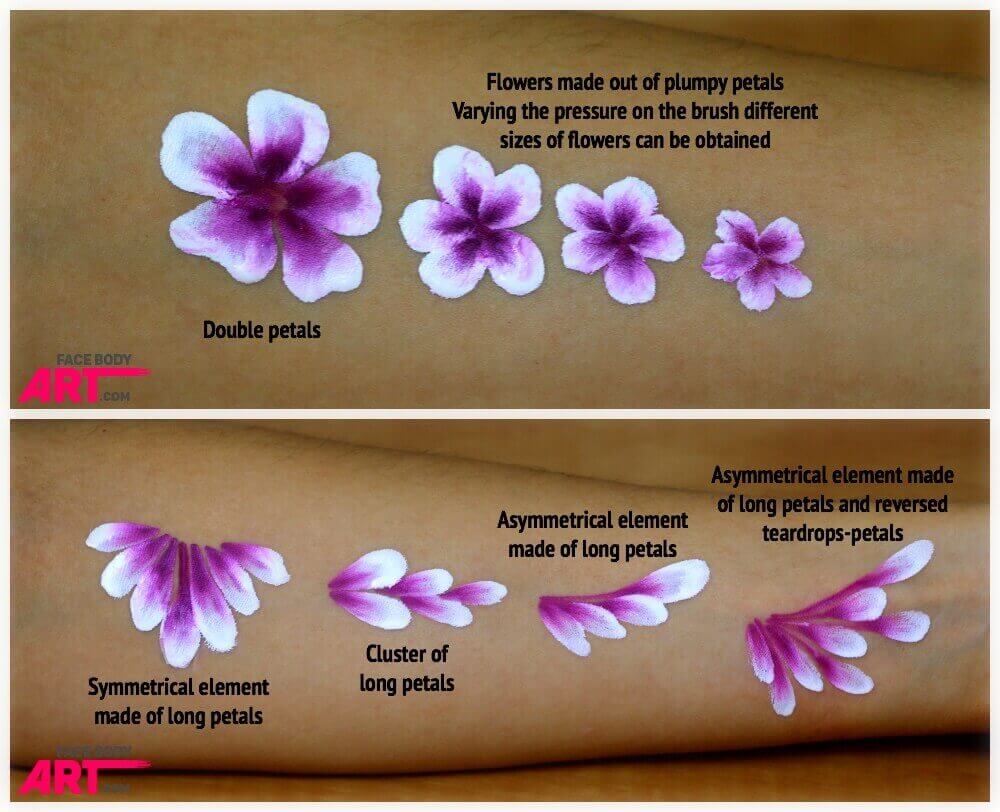
Double and triple dip techniques allow you to create petals or layered effects by loading your brush with a base color, then dipping the tip into one or two additional colors. These techniques deliver striking designs in a fraction of the time and impress clients instantly.
The Right Tools
Best Brush: #6 Round Brush
- Short bristles with firm, bold shape
- Kingart 7950 White nylon series (yellow wooden handles)
- Bolt FIRM round brushes (designed by JestPaint)
- Aliyah Round and Ultra Round
- Diamond FX, TAG — Look for "flora" or petal-specific designs
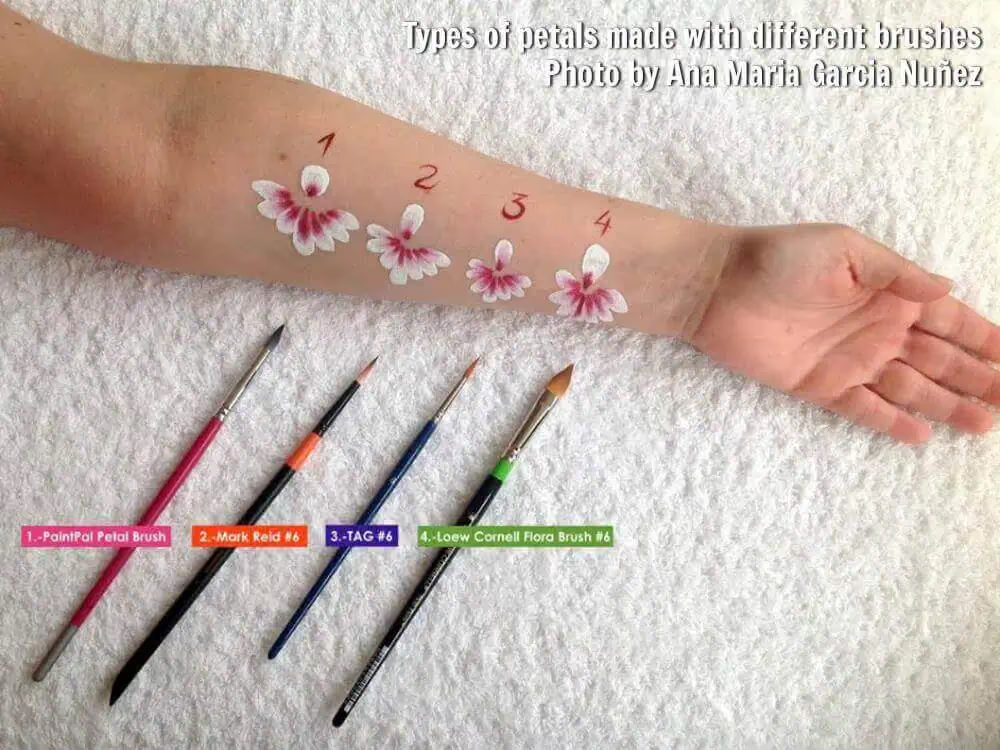
Color Selection
Base Color: Bright waxy white (Cameleon, Wolfe, Diamond FX, Kryvaline, Face Paint Australia)
Tip Color: Dark/vibrant accent — Magenta, pink, purple, or red
Why this order? White base + dark tip creates natural flower depth, stays vibrant, and mimics realistic structure.
Pro Technique Tips
Adjust brush pressure and angle for varied petal sizes and shapes.
- Load brush fully with base color (creamy consistency)
- Dip tip gently into accent color—don't overload
- Practice pressure variation: light = delicate, heavy = bold petals
- Use split-cakes when available for faster loading
Triple Dip: Load base color, dip one side of tip into color #1, opposite side into color #2 for rainbow petals.
Business Impact
A cluster of 5-7 double dip flowers takes 60-90 seconds. This technique is a crowd pleaser that looks highly professional, boosts your hourly rate, and creates standout portfolio designs.
Triple Dip: Load base color, dip one side of tip into color #1, opposite side into color #2 for rainbow petals.
Business Impact
A cluster of 5-7 double dip flowers takes 60-90 seconds. This technique is a crowd pleaser that looks highly professional, boosts your hourly rate, and creates standout portfolio designs.
Pro Tip: Adjust brush pressure and angle for varied petal sizes and shapes.
🎥 Watch this technique in action.
- One-Stroke Technique
Ideal for roses, leaves, and blended designs, the one-stroke technique uses a multi-color split-cake. Lightly moisten your brush, glide it across the paint, and apply smooth strokes to the skin for seamless gradients.
🎥 Learn the one-stroke technique here
- Using a Split-Cake with Sponges
Split-cakes can create vibrant backgrounds, blended shapes, or rainbow effects quickly. Spritz your cake lightly with water, dampen the sponge, and dab or swipe across the colors before applying to the skin.
Pro Tip: Keep the paint surface mostly dry to prevent muddy results.
- Design Placement & Focal Points
The human face is a three-dimensional canvas. Understanding placement and focal points ensures designs are balanced and harmonious. Flowers, masks, and character features should complement facial features for maximum impact.
The Seven Focal Points
Use these natural anchor points to guide placement:
- Center Forehead — Central designs, crowns, third eyes
- Bridge of Nose — Vertical designs, character noses
- Center Chin — Focal point designs, hearts
- Eye Corners — Wings, tears, directional elements
- Temple Areas — Framing designs, swirls, accents
- Cheekbone Peaks — Circular designs, character features
- Jawline — Flowing designs, waves, asymmetrical elements
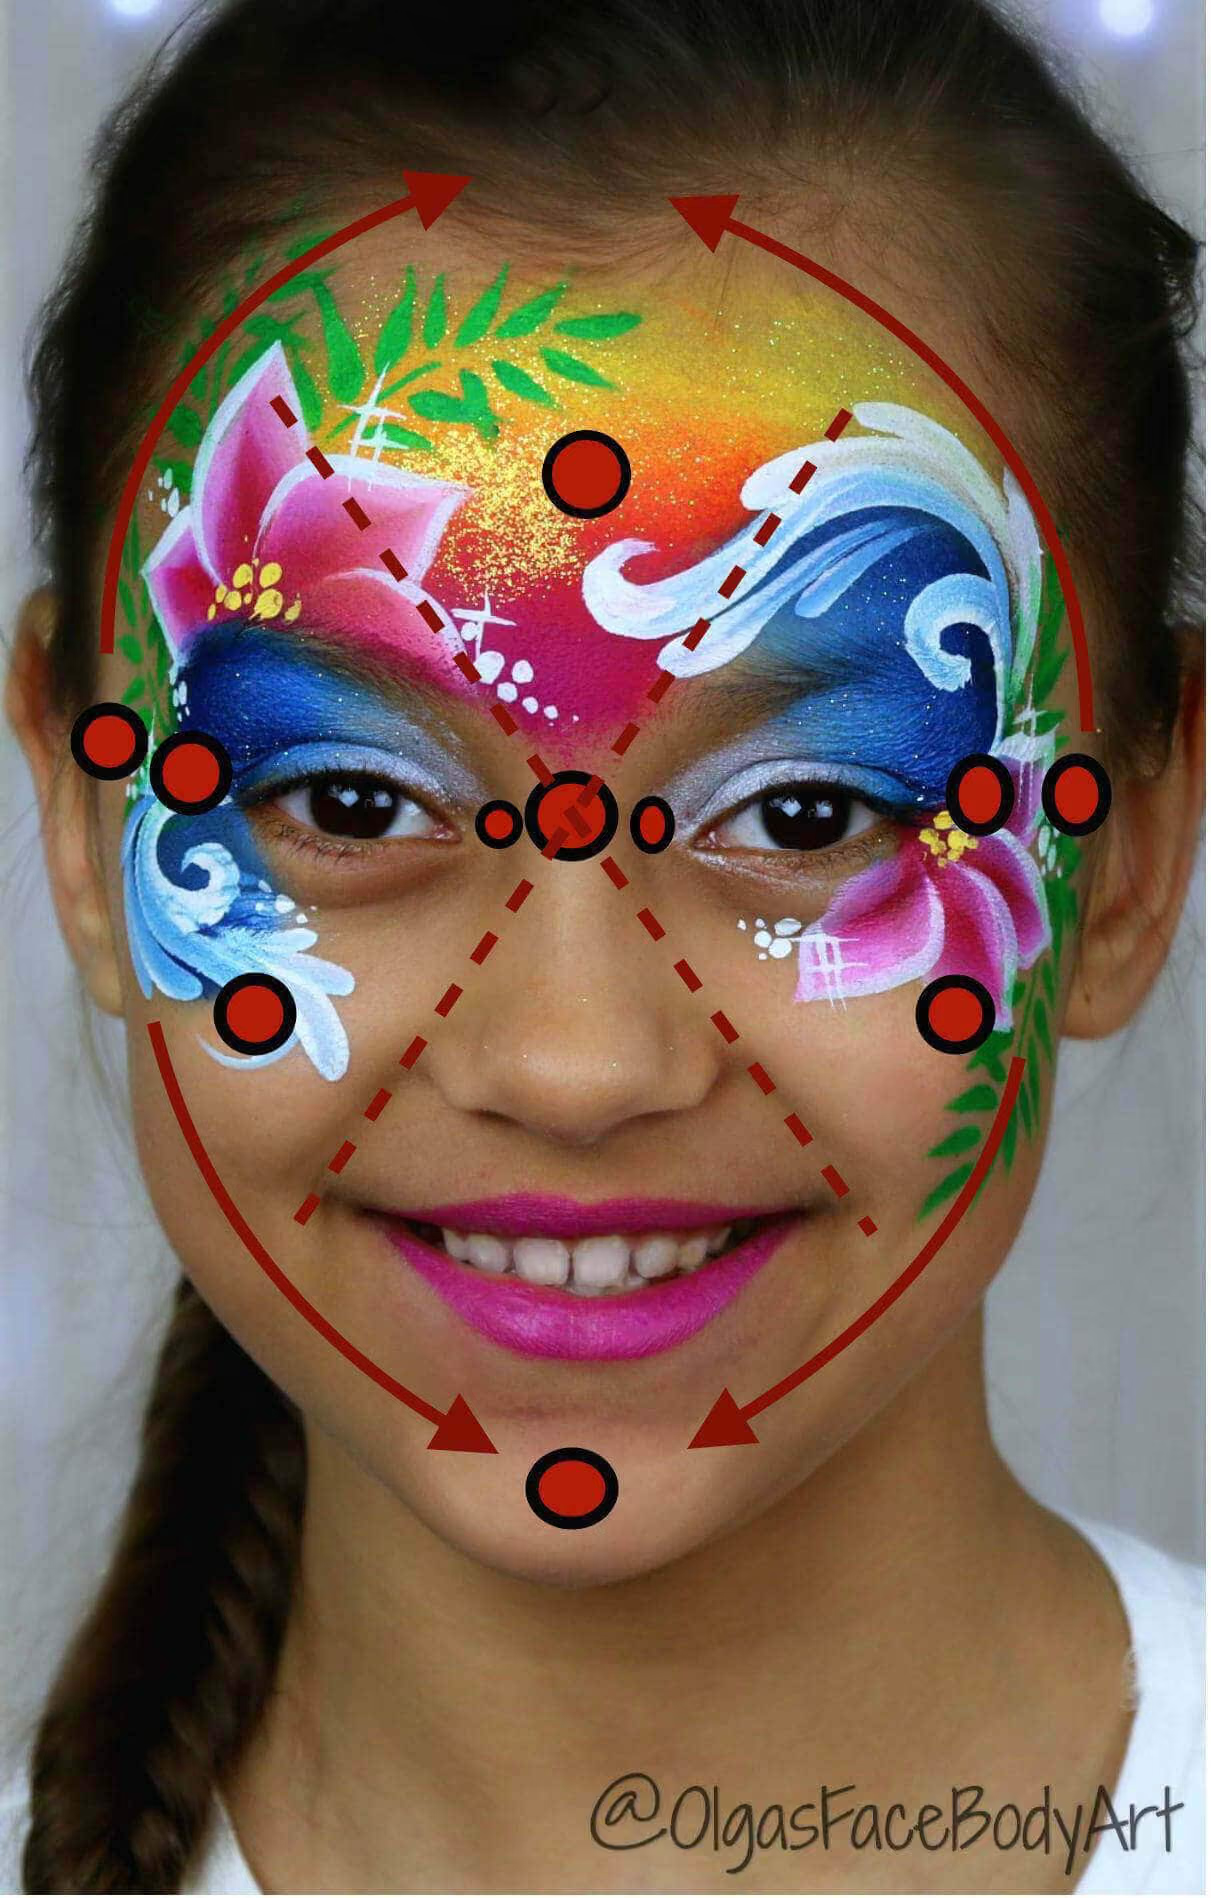
Pro Tip: Use facial anchor points to guide symmetry and design flow.
Balance Strategies
Symmetrical — Mirror identical elements using nose bridge and center chin as anchor lines.
Asymmetrical — Place elements off-center but balance with secondary accents using focal points as guides.
Center Composition — Center focal elements (eyes, forehead, chin) with symmetry for feminine designs.
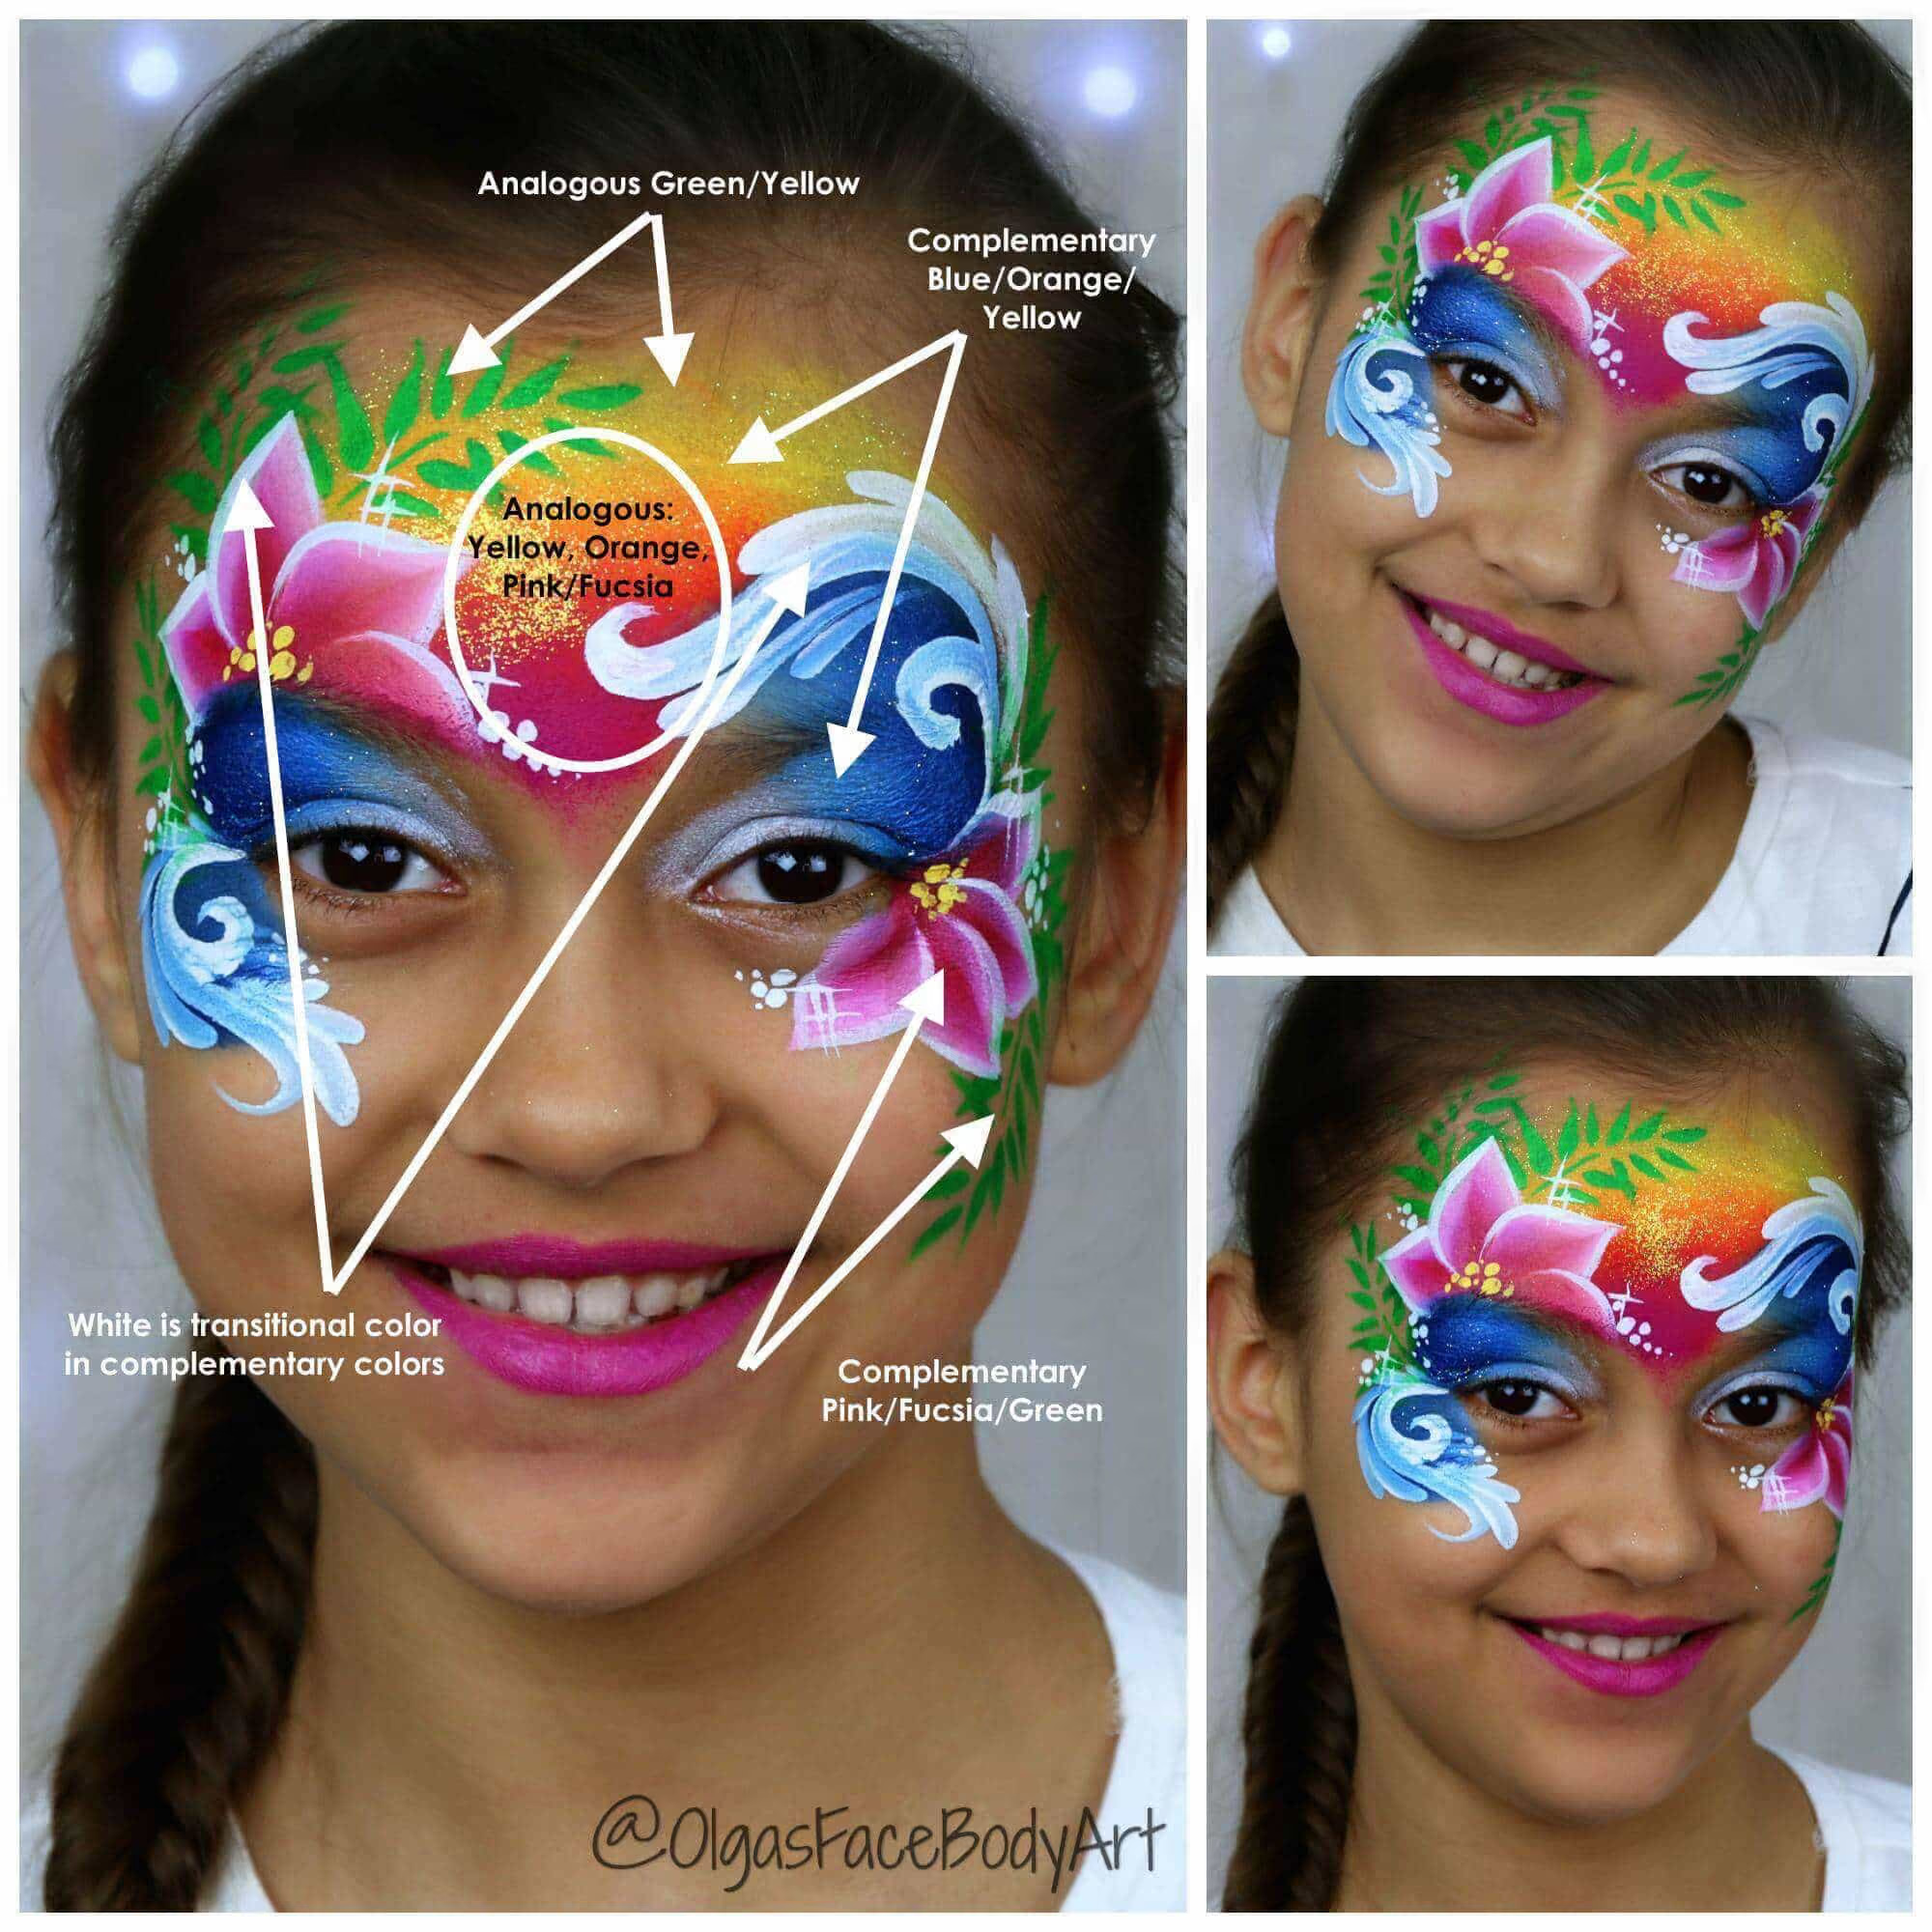
Color Balance
Complementary Colors — Opposite colors (red + green, blue + orange, yellow + purple) create instant harmony.
Analogous Colors — Similar colors tied together with complementary accents at focal points.
Skin Tone — Warm skin: jewel tones + warm accents. Cool skin: cool colors + icy accents.
Placement Examples
Flowers — Large focal flower on cheekbone, smaller blooms trailing to temple/jawline.
Waves/Swirls — Start at one temple, flow across forehead, finish at opposite temple.
Characters — Place features at natural focal points, add secondary details for depth.
Dots — Use focal points as cluster centers, scatter supporting dots along jawline.
🎥 Watch placement demonstrations on our YouTube channel.
💡 Pro Tip: These techniques are designed for those who have already mastered beginner and intermediate skills. Practicing them regularly will prepare you for certification and help you stand out as a professional face painter.
How to Practice
- Set up a dedicated space to practice
- Try to practice daily (even if it’s just a few lines)
- Make a list of goals (designs or techniques) to focus your practice
- Use your own arms/legs/face, brown paper, or practice boards
- Enlist the help of willing models (children, neighbors, friends, partners)
- Take photos to track your progress & be kind to yourself
What to Paint
It can feel overwhelming when there are so many designs out there. Here’s how you can start:
- Choose a minimum of 3 designs, both for girls and boys
- Practice these designs repeatedly to build muscle memory, first on practice paper, then on your face, and finally on models.
- Start with a limited set of designs you are good at, and build up your set over time.
- Take reference pictures with you on the job to help you with design placement & composition.
💡 Looking for inspiration? Find our Ultimate Face Painting Ideas Guide for both girls' and boys' designs, and more! ✨
Creating Your Original Designs
Copying designs is great for building skills, but you'll never fully master face painting until you create your own original designs.
Copying vs. Creating
Copying — Builds hand skills, proportion perception, and technique mastery. Essential for beginners.
Creating — Develops your unique style and personal artistic voice. Essential for professionals.
Both matter. Master the basics by copying, then evolve by creating.
The 6-Step Design Creation Algorithm
Step 1: Have a Design Idea
Decide what you want to paint—a character, animal, pattern, or mashup idea. Make it fast to execute but impressive to look at.
Step 2: Find Inspiration
Search Google, Pinterest, Instagram, YouTube, and Facebook groups for artistic inspiration. Look at how other professionals approach similar designs. Save 3–5 references.
Step 3: Figure Out Placement
Using focal points and facial landmarks as guides, decide where your design elements go. Sketch a quick placement collage to test positioning before painting.
Step 4: Sketch on Paper
Draw your design on paper to understand proportions and main shapes. This saves time when painting on skin.
Step 5: Practice on Pad/Model
Paint your design on a practice pad, your own face, or a willing model. This teaches you how the design sits on three-dimensional skin.
Step 6: Paint the Final Design
Once you've practiced and refined, paint the final version on a client.
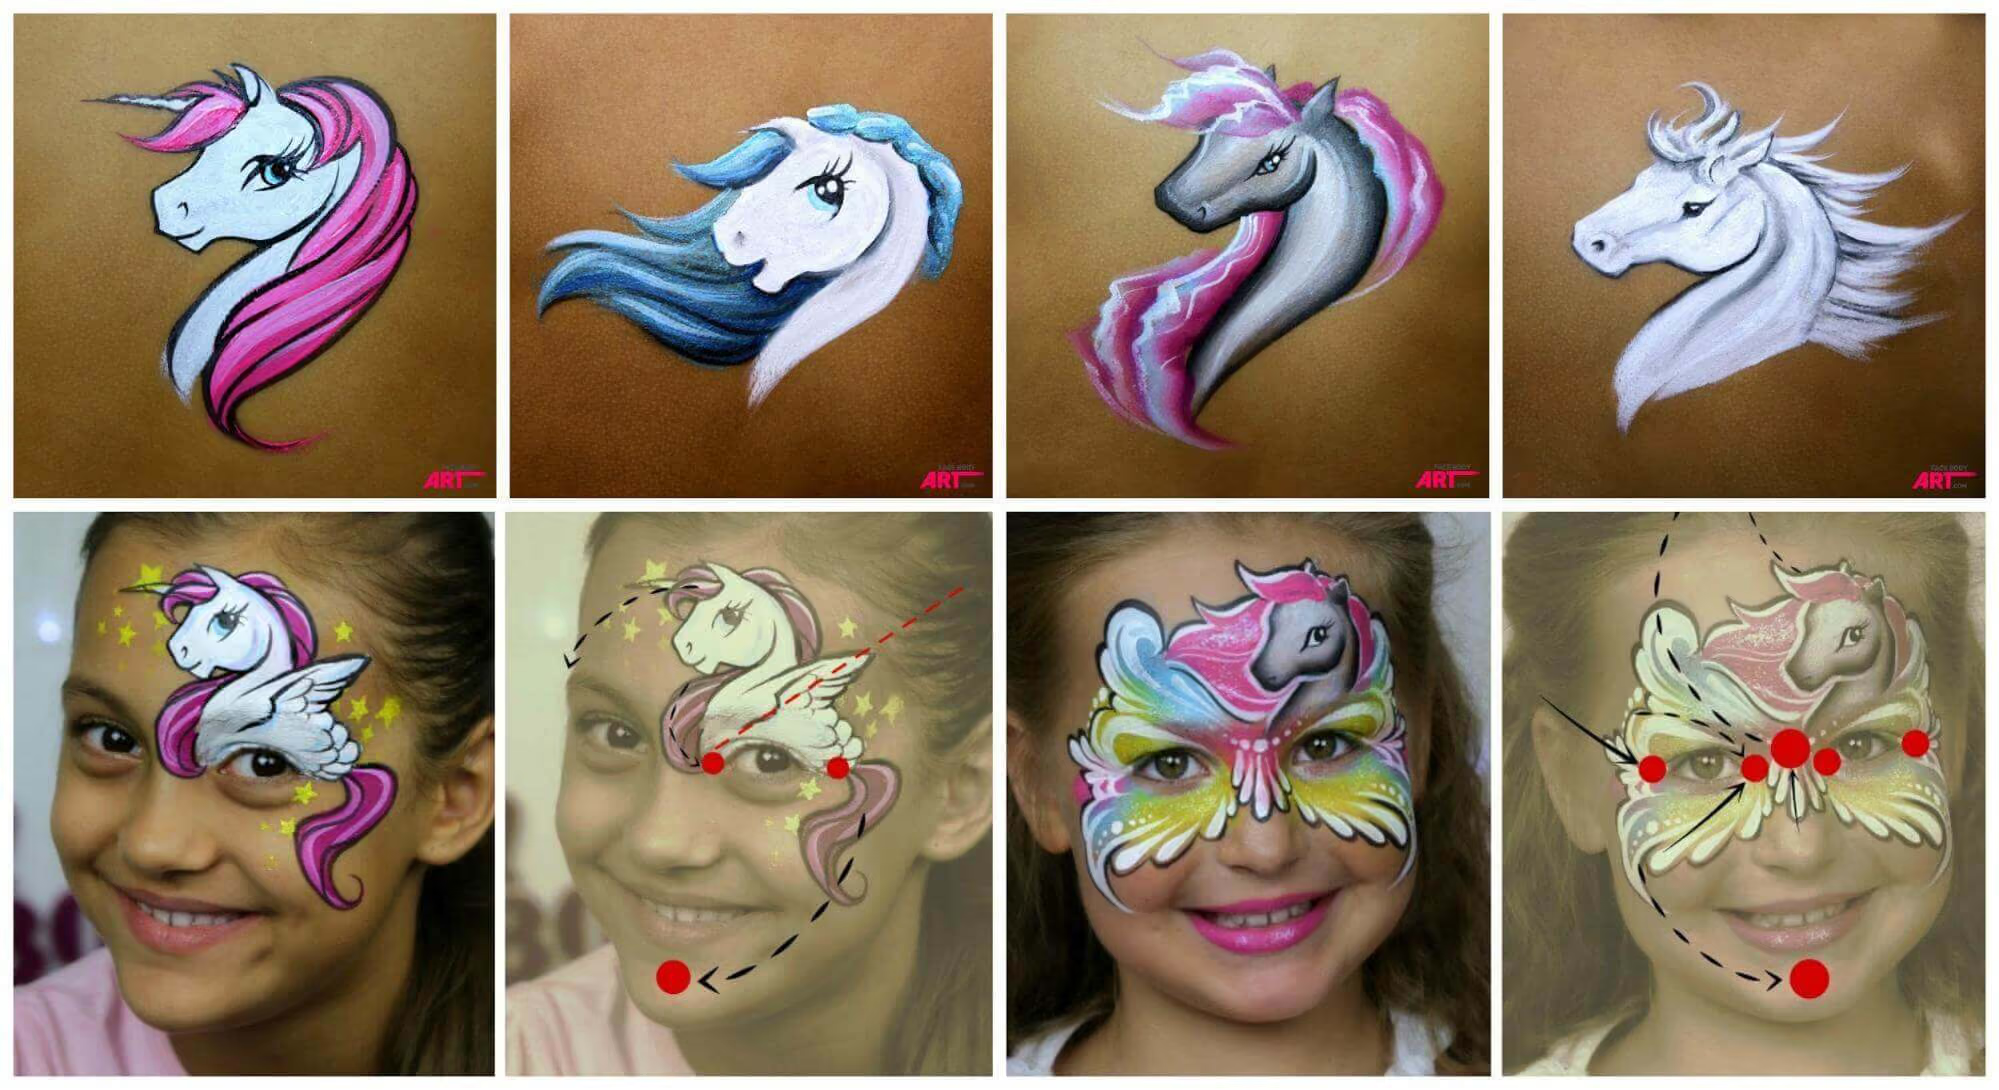
Pro Tips
Study how experienced artists approach similar designs — Not to copy, but to understand composition, color choices, and execution speed.
Balance speed with impression — The best designs look complex but paint quickly. This is where profitability lives.
Document your progress — Take photos of each iteration. You'll see how your style evolves and can showcase development in your portfolio.
Your style emerges through repetition — Keep creating variations on themes. Patterns in YOUR choices (color preferences, techniques, composition style) become your signature.
Remember: The world doesn't need another copy of an existing design. It needs YOUR unique interpretation. 🎨
Ongoing Training & Upskilling
- Online tutorials, Social Media & YouTube channels
- Courses from professional associations
- In-person workshops & conventions
- Online educational memberships or subscriptions
💡 Struggling with messy lines? Don’t stress — we’ve got you! ✨
Join our FREE 3-Day Improve Your Linework Workshop to master the techniques that will transform beginner designs into pro-level art.
Time Management Strategies
Consistent practice is what separates pros from hobbyists. Here's how busy artists actually find time to paint.
Daily Checklists
Write down tasks each morning, prioritizing the most important ones first. Don't stress if you can't complete everything — focus on what actually matters. Crossing items off provides momentum and keeps you organized during busy days.
Use a Mini-Kit
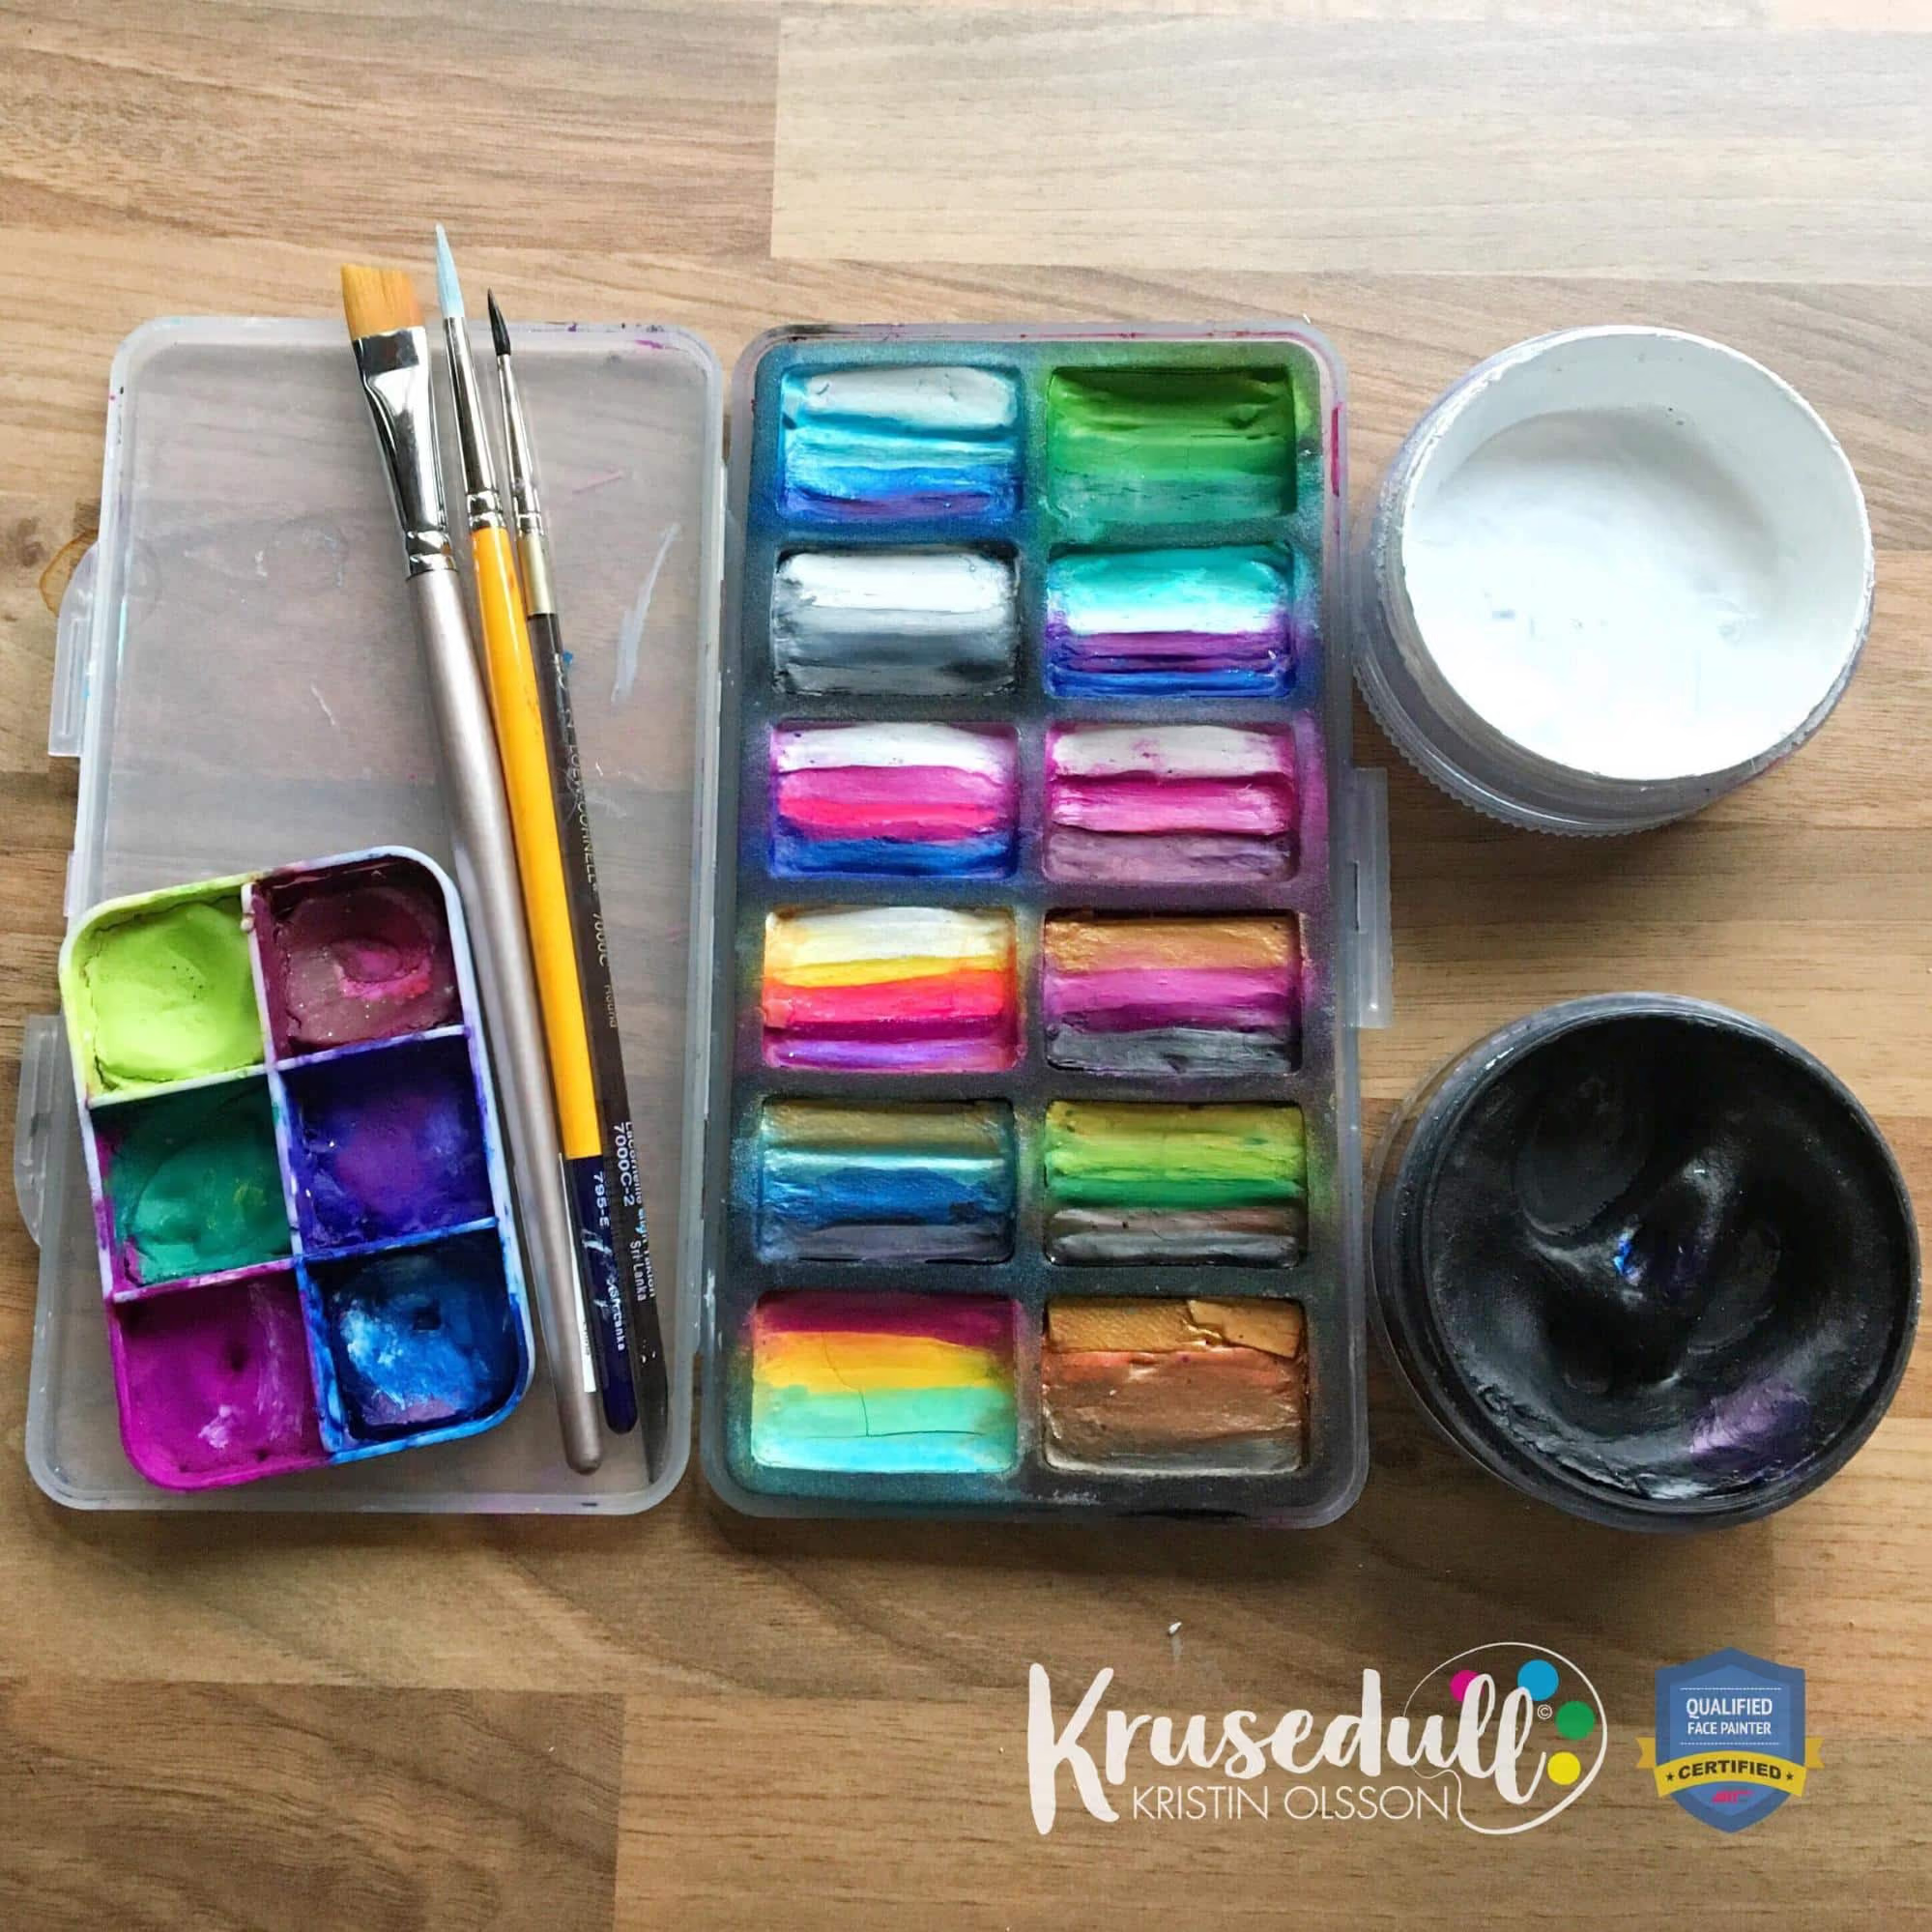
Full kits are overwhelming to unpack/repack. Create a mini-kit with 6 colors, a couple brushes, and your most-used colors. Keep it simple. This removes the friction that prevents practice — you can paint anytime without dreading setup/teardown.
Schedule Painting Time
Treat painting practice like a business appointment. Set specific times (early morning, during lunch breaks, after kids' bedtime). Your family needs to know this is work time. Even 10-15 minutes of daily practice beats sporadic long sessions.
Set Up a Paint Station
Designate a permanent space at home (corner of counter, spare shelf, unused room) where your paints and tools stay ready to use. When everything is already set up, a quick practice session becomes effortless. No setup = more practice.
Use Multiple Practice Surfaces
- Practice boards — Portable, convenient, use anywhere
- Practice heads — More realistic, shows layout and focal points
- Your own legs — Free, realistic skin texture, larger surface area
- Paper sketches — Still valuable for technique work
Switch between surfaces to avoid skill gaps. Boards are great, but skin practice is essential.
Keep a Sketchbook
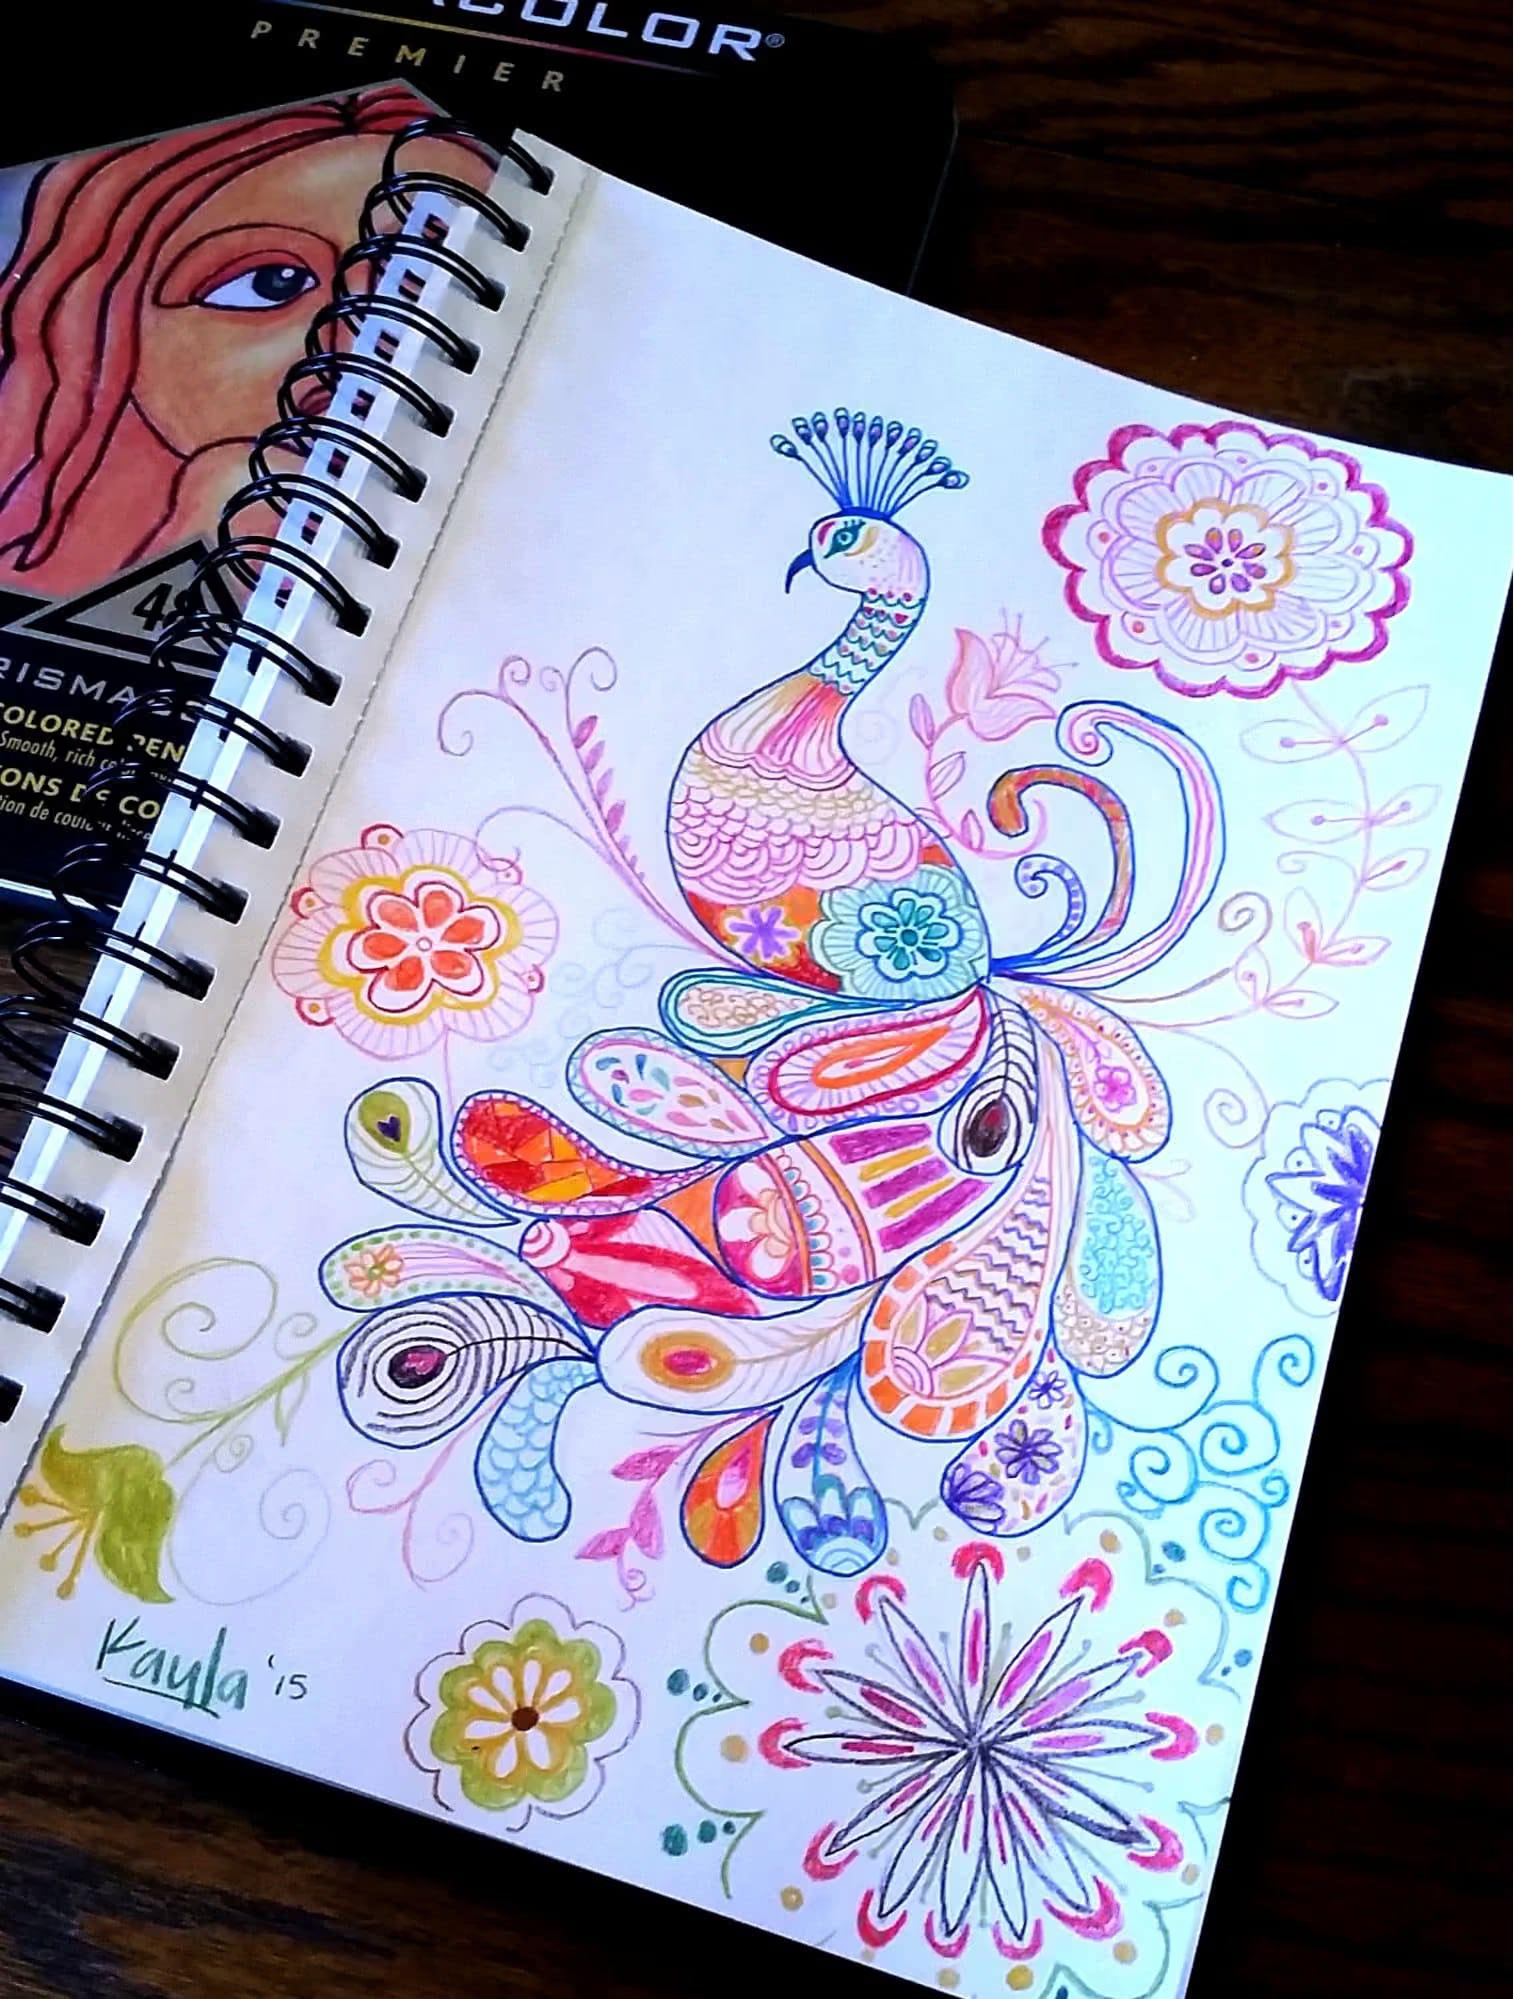
Capture design ideas the moment they pop into your head. A quick pen sketch keeps the idea from disappearing. When you have painting time, you're not starting from scratch — you have 20 ideas waiting.
The Real Math
Five minutes of practice = one full face at a pay-per-face gig = $5–$15 earned. Those minutes add up. The more efficient you are with time, the more effective you become in every area of your business.
Key principle: Flexibility + consistency = mastery. Some days you'll get 10 minutes, some days 60. Both count. Keep showing up.
📚 For more training tips, check out our Ultimate Face Painting Ideas Guide with step-by-step tutorials and design inspiration.
Becoming Certified
Certification is not always required, but it helps you stand out and build credibility for your clients.
Why Should You Certify?
- Builds trust with clients
- Confirms safety & hygiene training
- Can justify higher rates
Common Certifications
- IFPS (International Face Painting School Certification)
- FACE (The Face Painting Association)
- Local business licenses & insurance requirements
- Health & safety training
🎓 Thinking about turning face painting into a career?
Enroll in our online Beginner’s Course with world-class instructors. You’ll gain confidence, skills, and even a certification to boost your professional credibility.
Starting Your Business
Turning face painting into a paid service sounds like a dream job, but it requires some setup first.
Choosing Your Business Models
- Freelance: Solo bookings for parties/events
- Agency Contractor: Join an entertainment agency
- Festival Booth: Pay-per-face model
- Mobile Team: Work with assistants for larger events
Understanding Your Investment 💰
Face painting is a business. Budget for quality supplies, training, and marketing to build a sustainable income.
Initial Costs
💵 Professional Kit — $250–400 (quality paints, brushes, sponges, storage case)
📚 Professional Training — $395–1995 (online courses, workshops, conventions)
📢 Marketing — Business cards, flyers, Facebook ads, social media
📋 Business Registration — $100–1000 (one-time fee, location-dependent)
🛡️ Insurance — $50–300/year (professional liability protection)
Additional Expenses
🏕️ Outdoor Setup — $250–400 (canopy, folding table, high chair)
🚗 Transportation — Car maintenance and fuel for traveling to gigs
💼 Taxes & Bookkeeping — 10–40% depending on your country
⏰ Time — Prep, setup, driving, learning, promotion, cleanup (often more hours than actual painting)
Legal Setup & Admin
Business license and registration (check local requirements)
Liability insurance & consent forms (protect yourself and clients)
Booking & payment system (including tax tracking for quarterly payments)
Pricing Strategy & Financial Planning
Every region has different market standards, so your rates should reflect your local demand, experience level, and the type of event. For a broader view of real-world pricing across different countries, check out our guide:
How Much to Charge for Face Painting (Real Prices Around the World)
Here’s a general breakdown to help you get started:
💡 Tip: Require deposits to secure bookings, and charge for travel if outside your local area.
Getting Started Smart
- Start small — Begin with a basic $250 kit and minimal overhead
- Invest in quality training — Quality instruction saves years of trial-and-error mistakes
- Test tools before committing — Buy individual items; test them before purchasing full sets
- Price to cover costs + profit — Calculate your expenses and price accordingly
- Build gradually — Expand your kit and services as your income grows and skills develop
Remember
You're creating memories. Kids will walk away happy if you're calm, kind, and professional. That's what matters! ✨
Ready to take the next step? Enroll in our online Professional Course to get comprehensive business and technical training.
Finding Your First Clients
Your art is only valuable if people see it.
Types of Events You Can Book
- Children’s parties
- Festivals & carnivals
- Schools & community fairs
- Corporate events
- Cosplay & comic conventions
How to Market Yourself Professionally
- Build a simple website with a portfolio
- Use Instagram, TikTok, or Facebook to promote & showcase designs
- Add yourself to Google Maps & event directories
- Network with schools, PTA groups, and event planners
✨ Want design inspiration for your portfolio?
Check out our Ultimate Face Painting Ideas Guide for favorites across birthdays, Halloween, Christmas, and themed parties.
Maintaining & Growing Your Business
Once you’ve mastered the basics, expand your services.
📝 Ongoing Training & Upskilling
Keep your skills current by attending masterclasses, learning new trends like TikTok/YouTube styles, experimenting with advanced designs, and joining face painting communities.
- Masterclasses & Conventions (in-person or online)
- Trend Research & Experimentation
- Advanced Courses & Dedicated Face Painting Communities
✔️ Client Retention & Loyalty
Build lasting relationships by sending birthday reminders, offering referral bonuses, following up after events, and showcasing reviews.
- Birthday & Event Reminders
- Referral Programs
- Follow-Ups & Testimonials
📐 Scaling Your Operation
In time, grow your business by hiring an assistant, joining an entertainment agency, teaching workshops, or expanding into services like SFX makeup, body painting, and glitter tattoos.
- Hiring & Team Expansion
- Workshops & Courses
- New Services (SFX, Body Painting, Henna/Glitter Tattoos)
- Booking & Staff Management
🤝 Collaboration Over Competition
View other face painters as colleagues, not competitors. This mindset shift directly impacts your income and community.
The Shift
Competition: Undercut prices, protect clients, work alone.
Collaboration: Share bookings, refer overflow, build referral relationships.
Result: Rising market rates, more work for everyone, sustainable income.
Practical Benefits
More work — Refer overflow bookings to trusted colleagues; they'll return the favor.
Less travel — Trade bookings across geographic areas; more painting time, same income.
Better service — Large events need multiple painters; partnership = less stress, happier clients.
Backup support — Network covers you during illness or emergencies.
Higher rates — When painters collaborate instead of undercutting, everyone charges fairly.
The Real Story
MOUS (Norway): 20+ painters sharing bookings, training together, charging professional rates. Now servicing Denmark and Sweden. Constantly receiving referrals.
Why? The more good face painting in your community, the more face painters your community needs.
One Word: Colleagues
Connect with local painters. Share tips. Refer work. Build community.
This is how you build a sustainable, profitable business. 🎯
Safety & Professionalism
Never forget that the client's safety always comes first.
- Use only FDA/EU-approved paints
- Never apply paint near open wounds or rashes
- Sanitize brushes between clients & use one sponge per person (per color)
- Ask parents about allergies before painting children
- Have consent forms ready for schools or large events
Face Painting as an Art Form
Face painting has a rich history, spanning cultural rituals, celebrations, and modern festivals, and it keeps evolving with the times.
Popular ways artists are pushing the art forward include:
- Digital sketching: Many artists now plan designs in Procreate or Canva before putting paint on skin.
- AI inspiration: Tools like Midjourney help generate creative ideas and unique concepts.
- Cross-disciplinary creativity: Combining face painting with cosplay, performance art, and festival culture makes your designs more dynamic and opens doors to new gigs.
Resources & Tools
- Highly recommended brands: TAG, Diamond FX, Kryvaline, Fusion, PXP
- PRO starter kit is available to purchase online (from $200)
- Booking templates & Sample Contracts for Events
- We offer online courses & certification programs
- Face Painting Ideas
📥 Looking for a quick shopping list?
Download our FREE Top 10 Products Every Face Painter Needs handout to kickstart your kit.
Frequently Asked Questions ❓
❓ Q: How long does it take to become a professional?
✔️ A: With the right instruction, dedication & regular practice, most beginners can start paid gigs within 3–6 months.
❓ Q: Do I need a license?
✔️ A: Not always, but check local regulations. Insurance and safety training are strongly recommended.
❓ Q: What should I charge as a beginner?
✔️ A: You can start at $75–$100 per hour for small parties, then raise rates as you gain experience.
❓ Q: What’s the fastest way to build a portfolio?
✔️ A: Offer discounted or free sessions at local schools or fairs in exchange for photos. Or use your own face, family, or friends.

Take Your Face Painting One Step Further
Face painting is more than just putting colors on skin—it’s an art that grows with you. ✨ Start with the basics, practice regularly, and you’ll soon see your designs bring smiles—and even extra income. Every face you paint teaches you new tricks with color, lines, and creativity, setting you up for bigger gigs, festivals, or even teaching others your craft.
For extra tips and step-by-step tutorials, subscribe to our YouTube channel and keep learning as you grow!
Or sign up for one of our online courses, led by our expert instructors, to reach professional results in no time!
